


Information
# ESP32 NAT Router
This is a firmware to use the ESP32 as WiFi NAT router. It can be used as:
- Simple range extender for an existing WiFi network
- Setting up an additional WiFi network with different SSID/password and restricted access for guests or IOT devices
- Convert a corporate (WPA2-Enterprise) network to a regular network, for simple devices
- MCP-server to control your network using agentic AI
- Debugging and monitoring of WiFi devices
## Key Features
- **NAT Routing**: Full WiFi NAT router with IP forwarding (15+ Mbps throughput)
- **DHCP Reservations**: Assign fixed IPs to specific MAC addresses
- **Port Forwarding**: Map external ports to internal devices
- **Firewall**: Define ACL to restrict or monitor traffic
- **PCAP Capture**: Live packet capture can be streamed to Wireshark
- **WPA2-Enterprise Support**: Connect to corporate networks (PEAP, TTLS, TLS) and convert them to WPA2-PSK
- **Web Interface**: Web UI with password protection for easy configuration
- **Serial Console**: Full CLI for advanced configuration
- **Remote Console**: Network-accessible CLI via TCP (password protected)
- **Connected Clients Display**: View all connected devices with MAC, IP, and device names
- **Static IP Support**: Configure static IP for the STA (upstream) interface
- **LED Status Indicator**: Visual feedback for connection and traffic status
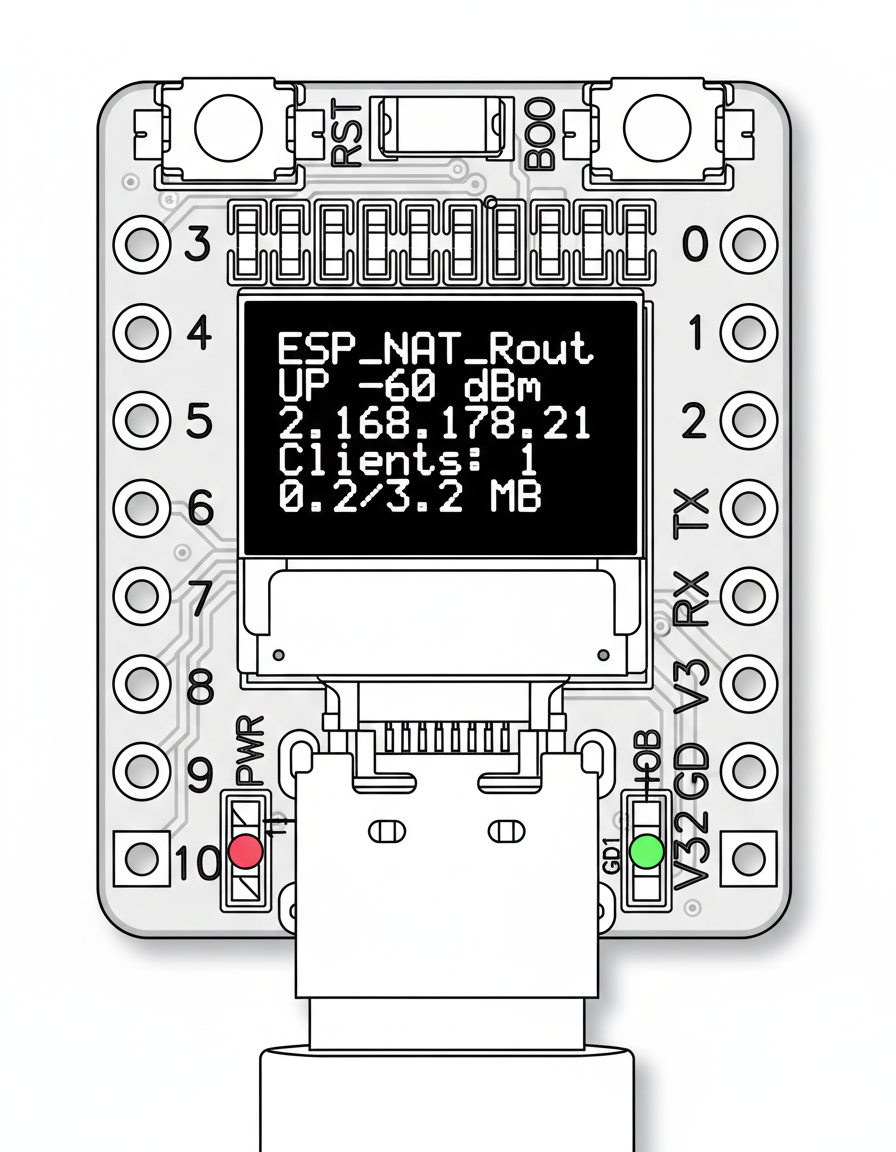
- **OLED Display**: Status display on 72x40 I2C SSD1306 OLEDs (as found on some ESP32-C3 mini boards)
- **TTL Override**: Set a fixed TTL for upstream packets (useful for hiding NAT from ISPs)
- **MCP Bridge (AI-Ready)**: BETA - Control the router from AI assistants (Claude, etc.) via the Model Context Protocol
The maximum number of simultaniously connected WiFi clients is 8 (5 on the ESP32c3) due to RAM limitations.
The code is originally based on the [Console Component](https://docs.espressif.com/projects/esp-idf/en/latest/api-guides/console.html#console) and the [esp-idf-nat-example](https://github.com/jonask1337/esp-idf-nat-example).
## First Boot
After first boot the ESP32 NAT Router will offer a WiFi network with an open AP and the ssid "ESP32_NAT_Router". Configuration can either be done via a web interface or via the serial console.
## Web Config Interface
The web interface allows for the configuration of all parameters. Connect your PC or smartphone to the WiFi SSID "ESP32_NAT_Router" and point your browser to "http://192.168.4.1" (or later the configured AP IP address).
The web interface consists of five pages:
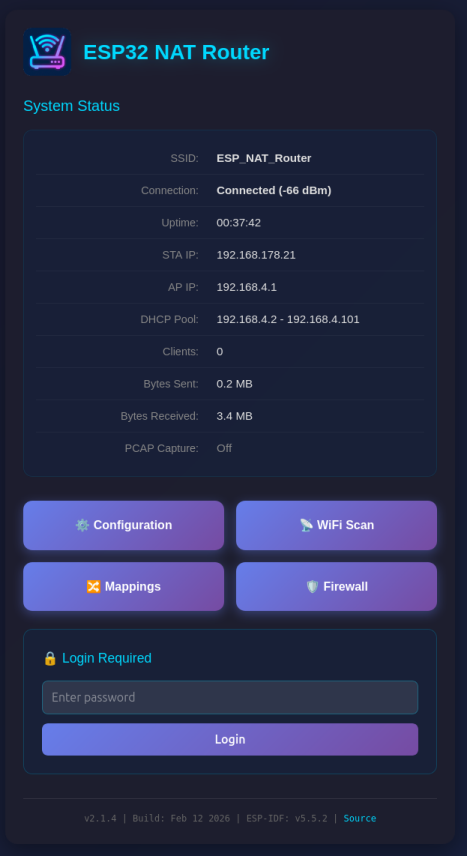
### System Status Page (/)
The main dashboard displays:
- Current connection status and uptime
- STA (upstream) and AP IP addresses and MAC addresses
- Used IP pool for DHCP
- Number of connected clients
- Bytes sent and received
- PCAP capture status (when enabled: captured/dropped packet counts)
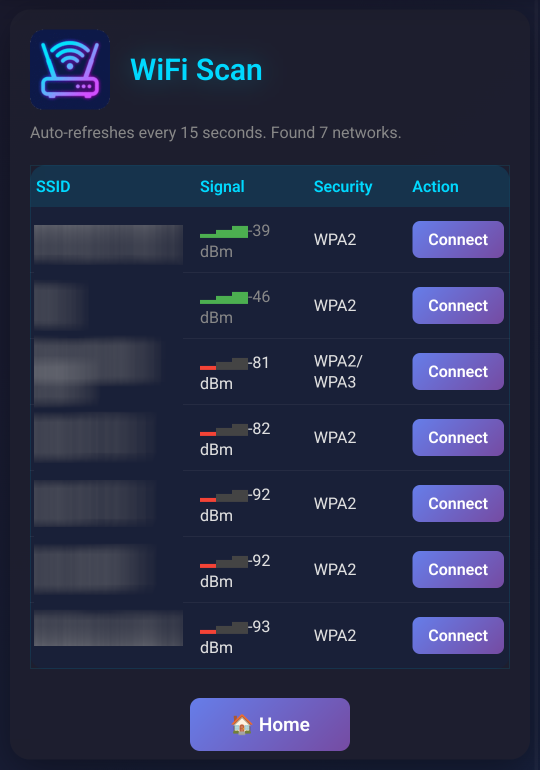
 ### WiFi Scan Page (/scan)
Shows a WiFi network scan and allows for direct connection via the config page.
### WiFi Scan Page (/scan)
Shows a WiFi network scan and allows for direct connection via the config page.
 ### Configuration Page (/config)
Configure all router settings:
- **Access Point Settings**: Configure the ESP32's access point name, password, IP address (default: 192.168.4.1), and MAC address
- **Station Settings (Uplink)**: Enter the SSID and password for the upstream WiFi network (leave password blank for open networks), with optional WPA2-Enterprise settings (EAP method, TTLS Phase 2, CA cert bundle, time check) and MAC address customization
- **Static IP Settings**: Optionally configure a static IP for the STA (upstream) interface
- **PCAP Packet Capture**: Enable/disable packet capture and configure snaplen (max bytes per packet)
- **Device Management**: Reboot the device
- Click "Apply", "Connect", or "Set Static IP" to apply changes (the ESP32 will reboot)
### Configuration Page (/config)
Configure all router settings:
- **Access Point Settings**: Configure the ESP32's access point name, password, IP address (default: 192.168.4.1), and MAC address
- **Station Settings (Uplink)**: Enter the SSID and password for the upstream WiFi network (leave password blank for open networks), with optional WPA2-Enterprise settings (EAP method, TTLS Phase 2, CA cert bundle, time check) and MAC address customization
- **Static IP Settings**: Optionally configure a static IP for the STA (upstream) interface
- **PCAP Packet Capture**: Enable/disable packet capture and configure snaplen (max bytes per packet)
- **Device Management**: Reboot the device
- Click "Apply", "Connect", or "Set Static IP" to apply changes (the ESP32 will reboot)
 Be aware that changes to AP settings (including the AP IP address) also affect the config interface itself - after changing the AP IP address, reconnect to the ESP32 at the new IP address to continue configuration. Also all currently defined DHCP reservations and port forwards will be deleted.
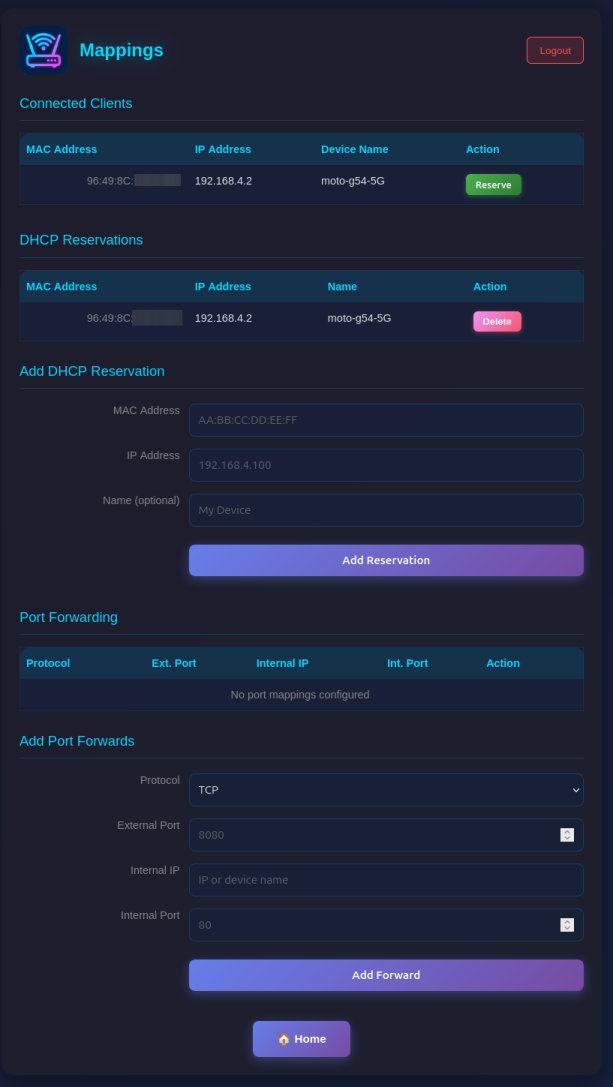
### Mappings Page (/mappings)
Manage network mappings:
- **Connected Clients**: Shows all currently connected clients with MAC, IP, and optially name.
- **DHCP Reservations**: Assign fixed IP addresses to specific MAC addresses (useful for servers/devices that need consistent IPs). Make sure you assign port numbers in the range of the DHCP pool.
- **Port Forwarding**: Create port mappings to access devices behind the NAT router (e.g., \`TCP 8080 -> 192.168.4.2:80\`)
Be aware that changes to AP settings (including the AP IP address) also affect the config interface itself - after changing the AP IP address, reconnect to the ESP32 at the new IP address to continue configuration. Also all currently defined DHCP reservations and port forwards will be deleted.
### Mappings Page (/mappings)
Manage network mappings:
- **Connected Clients**: Shows all currently connected clients with MAC, IP, and optially name.
- **DHCP Reservations**: Assign fixed IP addresses to specific MAC addresses (useful for servers/devices that need consistent IPs). Make sure you assign port numbers in the range of the DHCP pool.
- **Port Forwarding**: Create port mappings to access devices behind the NAT router (e.g., \`TCP 8080 -> 192.168.4.2:80\`)
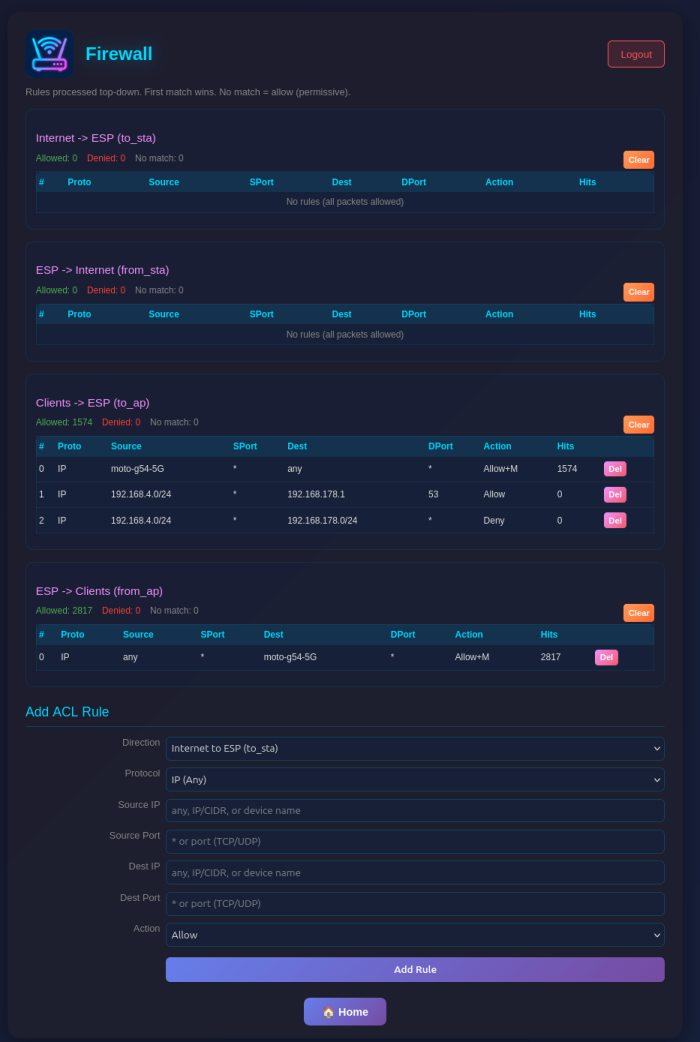
 ### Firewall Page (/firewall)
Configure Access Control Lists (ACLs) for packet filtering:
- **Four ACL Lists**: Control traffic in each direction (to_sta, from_sta, to_ap, from_ap)
- **Rule Management**: Add rules with protocol, source/destination IP, ports, and action (allow/deny)
- **Device Names**: Use device names from DHCP reservations instead of IP addresses for single-host rules
- **Monitoring**: Enable packet capture for specific rules with the Monitor flag
- **Statistics**: View hit counters for each rule and overall ACL statistics
### Firewall Page (/firewall)
Configure Access Control Lists (ACLs) for packet filtering:
- **Four ACL Lists**: Control traffic in each direction (to_sta, from_sta, to_ap, from_ap)
- **Rule Management**: Add rules with protocol, source/destination IP, ports, and action (allow/deny)
- **Device Names**: Use device names from DHCP reservations instead of IP addresses for single-host rules
- **Monitoring**: Enable packet capture for specific rules with the Monitor flag
- **Statistics**: View hit counters for each rule and overall ACL statistics
 ### Web Interface Security
The web interface is visible on both interfaces (AP and STA) and allows configuration access to all parameters. Two security mechanisms are available:
#### Password Protection
You can protect the \`/config\` and \`/mappings\` pages with a password. The main status page (\`/\`) remains accessible but will show a login form.
**Setting a Password (Web Interface):**
- On the main page (\`/\`), scroll to the "Set Password" section
- Enter and confirm your new password
- Click "Set Password"
- The page will reload and show a login form
**Setting a Password (Serial Console):**
\`\`\`
set_router_password mypassword
\`\`\`
To disable password protection, set an empty password:
\`\`\`
set_router_password ""
\`\`\`
When password protection is enabled:
- The main page shows system status and a login form
- After successful login, you can access \`/config\` and \`/mappings\`
- Sessions expire after 30 minutes of inactivity
- A "Logout" button appears on all pages when logged in
#### Disabling the Web Interface
For maximum security in open environments, you can completely disable the web interface:
**From the Web Interface:**
- Navigate to the \`/config\` page
- Scroll to the "Danger Zone" section at the bottom
- Click "Disable" button
- Confirm the warning dialog
- The device will reboot with the web interface disabled
**From the Serial Console:**
\`\`\`
web_ui disable
\`\`\`
After disabling, the web interface will be completely inaccessible. Re-enable it via the serial console with:
\`\`\`
web_ui enable
\`\`\`
If you made a mistake and have lost all contact with the ESP you can still use the serial console to reconfigure it. All parameter settings are stored in NVS (non volatile storage), which is *not* erased by simple re-flashing the binaries. If you want to wipe it out, use "esptool.py -p /dev/ttyUSB0 erase_flash".
## Access devices behind the router
If you want to access a device behind the esp32 NAT router: \`PC -> local router -> esp32NAT -> server\`
### DHCP Reservations
To ensure devices behind the router always get the same IP address, you can configure DHCP reservations:
\`\`\`
dhcp_reserve add AA:BB:CC:DD:EE:FF 192.168.4.10 -n MyServer
↑ optional friendly name
↑ reserved IP address
↑ device MAC address
\`\`\`
This is useful for servers or IoT devices that other devices need to connect to reliably.
### Port Forwarding
Let's say "server" is exposing a webserver on port 80 and you want to access that from your PC outside the NAT network.
For that you need to configure a port mapping (via the web interface at \`/mappings\` or the serial console):
\`\`\`
portmap add TCP 8080 192.168.4.2 80
↑ port of the webserver
↑ server's ip in esp32NAT network
↑ exposed port in the local router's network
\`\`\`
Assuming the esp32NAT's IP address in your \`local router\` is \`192.168.0.57\`, you can access the server by typing \`192.168.0.57:8080\` into your browser.
**Tip:** When you assign a name to a DHCP reservation, you can use that name instead of the IP address when creating firewall (ACL) rules. For example, after creating a reservation with \`-n MyPhone\`, you can use \`MyPhone\` as source or destination in ACL rules.
## Firewall (ACL)
The router includes a stateless packet filtering firewall with four Access Control Lists (ACLs), one for each traffic direction.
### Network Topology
\`\`\`
ESP32 NAT Router
┌───────────────────────┐
│ │
Internet ◄──────────►│ STA AP │◄──────────► Internal
(Upstream) │ Interface Interface │ Clients
│ │
└───────────────────────┘
\`\`\`
### ACL Naming Convention
ACLs are named from the perspective of each interface - "to" means traffic arriving at the interface, "from" means traffic leaving the interface:
\`\`\`
ESP32
┌───────────────────────┐
│ │
Internet ──to_sta───►│ STA AP │◄───to_ap─── Clients
◄──from_sta─│ │───from_ap──►
│ │
└───────────────────────┘
\`\`\`
| ACL | Interface | Direction | Description |
|-----|-----------|-----------|-------------|
| **to_sta** | STA | Inbound | Internet → ESP32 (traffic arriving at STA interface) |
| **from_sta** | STA | Outbound | ESP32 → Internet (traffic leaving STA interface) |
| **to_ap** | AP | Inbound | Clients → ESP32 (traffic arriving at AP interface) |
| **from_ap** | AP | Outbound | ESP32 → Clients (traffic leaving AP interface) |
### Use Cases
- **to_sta**: Block unwanted incoming traffic from the Internet
- **from_sta**: Control what internal clients can access on the Internet
- **to_ap**: Filter traffic from specific internal clients
- **from_ap**: Control what traffic reaches internal clients
### Web Interface
Access the firewall configuration at \`/firewall\`. For each ACL you can:
- Add rules with source/destination IP (CIDR notation), protocol, ports, and action
- Use device names from DHCP reservations instead of IP addresses (for single-host /32 rules)
- Enable monitoring to capture matching packets to PCAP
- View hit counters and statistics (device names shown for /32 addresses with reservations)
- Delete individual rules or clear entire lists
### Console Commands
\`\`\`
acl show [
### Web Interface Security
The web interface is visible on both interfaces (AP and STA) and allows configuration access to all parameters. Two security mechanisms are available:
#### Password Protection
You can protect the \`/config\` and \`/mappings\` pages with a password. The main status page (\`/\`) remains accessible but will show a login form.
**Setting a Password (Web Interface):**
- On the main page (\`/\`), scroll to the "Set Password" section
- Enter and confirm your new password
- Click "Set Password"
- The page will reload and show a login form
**Setting a Password (Serial Console):**
\`\`\`
set_router_password mypassword
\`\`\`
To disable password protection, set an empty password:
\`\`\`
set_router_password ""
\`\`\`
When password protection is enabled:
- The main page shows system status and a login form
- After successful login, you can access \`/config\` and \`/mappings\`
- Sessions expire after 30 minutes of inactivity
- A "Logout" button appears on all pages when logged in
#### Disabling the Web Interface
For maximum security in open environments, you can completely disable the web interface:
**From the Web Interface:**
- Navigate to the \`/config\` page
- Scroll to the "Danger Zone" section at the bottom
- Click "Disable" button
- Confirm the warning dialog
- The device will reboot with the web interface disabled
**From the Serial Console:**
\`\`\`
web_ui disable
\`\`\`
After disabling, the web interface will be completely inaccessible. Re-enable it via the serial console with:
\`\`\`
web_ui enable
\`\`\`
If you made a mistake and have lost all contact with the ESP you can still use the serial console to reconfigure it. All parameter settings are stored in NVS (non volatile storage), which is *not* erased by simple re-flashing the binaries. If you want to wipe it out, use "esptool.py -p /dev/ttyUSB0 erase_flash".
## Access devices behind the router
If you want to access a device behind the esp32 NAT router: \`PC -> local router -> esp32NAT -> server\`
### DHCP Reservations
To ensure devices behind the router always get the same IP address, you can configure DHCP reservations:
\`\`\`
dhcp_reserve add AA:BB:CC:DD:EE:FF 192.168.4.10 -n MyServer
↑ optional friendly name
↑ reserved IP address
↑ device MAC address
\`\`\`
This is useful for servers or IoT devices that other devices need to connect to reliably.
### Port Forwarding
Let's say "server" is exposing a webserver on port 80 and you want to access that from your PC outside the NAT network.
For that you need to configure a port mapping (via the web interface at \`/mappings\` or the serial console):
\`\`\`
portmap add TCP 8080 192.168.4.2 80
↑ port of the webserver
↑ server's ip in esp32NAT network
↑ exposed port in the local router's network
\`\`\`
Assuming the esp32NAT's IP address in your \`local router\` is \`192.168.0.57\`, you can access the server by typing \`192.168.0.57:8080\` into your browser.
**Tip:** When you assign a name to a DHCP reservation, you can use that name instead of the IP address when creating firewall (ACL) rules. For example, after creating a reservation with \`-n MyPhone\`, you can use \`MyPhone\` as source or destination in ACL rules.
## Firewall (ACL)
The router includes a stateless packet filtering firewall with four Access Control Lists (ACLs), one for each traffic direction.
### Network Topology
\`\`\`
ESP32 NAT Router
┌───────────────────────┐
│ │
Internet ◄──────────►│ STA AP │◄──────────► Internal
(Upstream) │ Interface Interface │ Clients
│ │
└───────────────────────┘
\`\`\`
### ACL Naming Convention
ACLs are named from the perspective of each interface - "to" means traffic arriving at the interface, "from" means traffic leaving the interface:
\`\`\`
ESP32
┌───────────────────────┐
│ │
Internet ──to_sta───►│ STA AP │◄───to_ap─── Clients
◄──from_sta─│ │───from_ap──►
│ │
└───────────────────────┘
\`\`\`
| ACL | Interface | Direction | Description |
|-----|-----------|-----------|-------------|
| **to_sta** | STA | Inbound | Internet → ESP32 (traffic arriving at STA interface) |
| **from_sta** | STA | Outbound | ESP32 → Internet (traffic leaving STA interface) |
| **to_ap** | AP | Inbound | Clients → ESP32 (traffic arriving at AP interface) |
| **from_ap** | AP | Outbound | ESP32 → Clients (traffic leaving AP interface) |
### Use Cases
- **to_sta**: Block unwanted incoming traffic from the Internet
- **from_sta**: Control what internal clients can access on the Internet
- **to_ap**: Filter traffic from specific internal clients
- **from_ap**: Control what traffic reaches internal clients
### Web Interface
Access the firewall configuration at \`/firewall\`. For each ACL you can:
- Add rules with source/destination IP (CIDR notation), protocol, ports, and action
- Use device names from DHCP reservations instead of IP addresses (for single-host /32 rules)
- Enable monitoring to capture matching packets to PCAP
- View hit counters and statistics (device names shown for /32 addresses with reservations)
- Delete individual rules or clear entire lists
### Console Commands
\`\`\`
acl show [
### WiFi Scan Page (/scan)
Shows a WiFi network scan and allows for direct connection via the config page.
### Configuration Page (/config)
Configure all router settings:
- **Access Point Settings**: Configure the ESP32's access point name, password, IP address (default: 192.168.4.1), and MAC address
- **Station Settings (Uplink)**: Enter the SSID and password for the upstream WiFi network (leave password blank for open networks), with optional WPA2-Enterprise settings (EAP method, TTLS Phase 2, CA cert bundle, time check) and MAC address customization
- **Static IP Settings**: Optionally configure a static IP for the STA (upstream) interface
- **PCAP Packet Capture**: Enable/disable packet capture and configure snaplen (max bytes per packet)
- **Device Management**: Reboot the device
- Click "Apply", "Connect", or "Set Static IP" to apply changes (the ESP32 will reboot)
Be aware that changes to AP settings (including the AP IP address) also affect the config interface itself - after changing the AP IP address, reconnect to the ESP32 at the new IP address to continue configuration. Also all currently defined DHCP reservations and port forwards will be deleted.
### Mappings Page (/mappings)
Manage network mappings:
- **Connected Clients**: Shows all currently connected clients with MAC, IP, and optially name.
- **DHCP Reservations**: Assign fixed IP addresses to specific MAC addresses (useful for servers/devices that need consistent IPs). Make sure you assign port numbers in the range of the DHCP pool.
- **Port Forwarding**: Create port mappings to access devices behind the NAT router (e.g., \`TCP 8080 -> 192.168.4.2:80\`)
### Firewall Page (/firewall)
Configure Access Control Lists (ACLs) for packet filtering:
- **Four ACL Lists**: Control traffic in each direction (to_sta, from_sta, to_ap, from_ap)
- **Rule Management**: Add rules with protocol, source/destination IP, ports, and action (allow/deny)
- **Device Names**: Use device names from DHCP reservations instead of IP addresses for single-host rules
- **Monitoring**: Enable packet capture for specific rules with the Monitor flag
- **Statistics**: View hit counters for each rule and overall ACL statistics
### Web Interface Security
The web interface is visible on both interfaces (AP and STA) and allows configuration access to all parameters. Two security mechanisms are available:
#### Password Protection
You can protect the \`/config\` and \`/mappings\` pages with a password. The main status page (\`/\`) remains accessible but will show a login form.
**Setting a Password (Web Interface):**
- On the main page (\`/\`), scroll to the "Set Password" section
- Enter and confirm your new password
- Click "Set Password"
- The page will reload and show a login form
**Setting a Password (Serial Console):**
\`\`\`
set_router_password mypassword
\`\`\`
To disable password protection, set an empty password:
\`\`\`
set_router_password ""
\`\`\`
When password protection is enabled:
- The main page shows system status and a login form
- After successful login, you can access \`/config\` and \`/mappings\`
- Sessions expire after 30 minutes of inactivity
- A "Logout" button appears on all pages when logged in
#### Disabling the Web Interface
For maximum security in open environments, you can completely disable the web interface:
**From the Web Interface:**
- Navigate to the \`/config\` page
- Scroll to the "Danger Zone" section at the bottom
- Click "Disable" button
- Confirm the warning dialog
- The device will reboot with the web interface disabled
**From the Serial Console:**
\`\`\`
web_ui disable
\`\`\`
After disabling, the web interface will be completely inaccessible. Re-enable it via the serial console with:
\`\`\`
web_ui enable
\`\`\`
If you made a mistake and have lost all contact with the ESP you can still use the serial console to reconfigure it. All parameter settings are stored in NVS (non volatile storage), which is *not* erased by simple re-flashing the binaries. If you want to wipe it out, use "esptool.py -p /dev/ttyUSB0 erase_flash".
## Access devices behind the router
If you want to access a device behind the esp32 NAT router: \`PC -> local router -> esp32NAT -> server\`
### DHCP Reservations
To ensure devices behind the router always get the same IP address, you can configure DHCP reservations:
\`\`\`
dhcp_reserve add AA:BB:CC:DD:EE:FF 192.168.4.10 -n MyServer
↑ optional friendly name
↑ reserved IP address
↑ device MAC address
\`\`\`
This is useful for servers or IoT devices that other devices need to connect to reliably.
### Port Forwarding
Let's say "server" is exposing a webserver on port 80 and you want to access that from your PC outside the NAT network.
For that you need to configure a port mapping (via the web interface at \`/mappings\` or the serial console):
\`\`\`
portmap add TCP 8080 192.168.4.2 80
↑ port of the webserver
↑ server's ip in esp32NAT network
↑ exposed port in the local router's network
\`\`\`
Assuming the esp32NAT's IP address in your \`local router\` is \`192.168.0.57\`, you can access the server by typing \`192.168.0.57:8080\` into your browser.
**Tip:** When you assign a name to a DHCP reservation, you can use that name instead of the IP address when creating firewall (ACL) rules. For example, after creating a reservation with \`-n MyPhone\`, you can use \`MyPhone\` as source or destination in ACL rules.
## Firewall (ACL)
The router includes a stateless packet filtering firewall with four Access Control Lists (ACLs), one for each traffic direction.
### Network Topology
\`\`\`
ESP32 NAT Router
┌───────────────────────┐
│ │
Internet ◄──────────►│ STA AP │◄──────────► Internal
(Upstream) │ Interface Interface │ Clients
│ │
└───────────────────────┘
\`\`\`
### ACL Naming Convention
ACLs are named from the perspective of each interface - "to" means traffic arriving at the interface, "from" means traffic leaving the interface:
\`\`\`
ESP32
┌───────────────────────┐
│ │
Internet ──to_sta───►│ STA AP │◄───to_ap─── Clients
◄──from_sta─│ │───from_ap──►
│ │
└───────────────────────┘
\`\`\`
| ACL | Interface | Direction | Description |
|-----|-----------|-----------|-------------|
| **to_sta** | STA | Inbound | Internet → ESP32 (traffic arriving at STA interface) |
| **from_sta** | STA | Outbound | ESP32 → Internet (traffic leaving STA interface) |
| **to_ap** | AP | Inbound | Clients → ESP32 (traffic arriving at AP interface) |
| **from_ap** | AP | Outbound | ESP32 → Clients (traffic leaving AP interface) |
### Use Cases
- **to_sta**: Block unwanted incoming traffic from the Internet
- **from_sta**: Control what internal clients can access on the Internet
- **to_ap**: Filter traffic from specific internal clients
- **from_ap**: Control what traffic reaches internal clients
### Web Interface
Access the firewall configuration at \`/firewall\`. For each ACL you can:
- Add rules with source/destination IP (CIDR notation), protocol, ports, and action
- Use device names from DHCP reservations instead of IP addresses (for single-host /32 rules)
- Enable monitoring to capture matching packets to PCAP
- View hit counters and statistics (device names shown for /32 addresses with reservations)
- Delete individual rules or clear entire lists
### Console Commands
\`\`\`
acl show [- ] # Show rules and stats
acl add
- # Clear all rules
\`\`\`
**Address formats:**
- \`any\` - matches any IP address
- \`192.168.4.0/24\` - CIDR notation (network/mask)
- \`192.168.4.100\` - single host (equivalent to /32)
- \`MyPhone\` - device name from DHCP reservations (resolved to /32)
When displaying rules, device names are shown instead of IP addresses for /32 rules that have a matching DHCP reservation with a name.
**Examples:**
\`\`\`
# Block incoming traffic from a specific IP
acl add to_sta IP 203.0.113.50 * any * deny
# Block a specific device by name (from DHCP reservation)
acl add from_ap IP any * MyPhone * deny
# Allow only DNS and HTTP/HTTPS from clients to Internet
acl add to_ap UDP any * any 53 allow
acl add to_ap TCP any * any 80 allow
acl add to_ap TCP any * any 443 allow
acl add from_sta IP any * any * deny
\`\`\`
### Rule Processing
- Rules are evaluated in order (first match wins)
- If no rule matches, the packet is **allowed** (permissive default)
- Non-IPv4 traffic (ARP, IPv6) passes through without filtering
- Port filters only apply to TCP/UDP packets; rules with port filters won't match ICMP or other protocols
- Rules persist in NVS storage
### ACL Actions and PCAP Capture
Each rule can have one of four actions:
| Action | Packet | Captured to PCAP |
|--------|--------|------------------|
| \`allow\` | Allowed | No |
| \`deny\` | Dropped | No |
| \`allow_monitor\` | Allowed | Yes (in ACL mode) |
| \`deny_monitor\` | Dropped | Yes (in ACL mode, before drop) |
## PCAP Packet Capture
The router includes a built-in packet capture feature that streams traffic to Wireshark in real-time via TCP.
### Capture Modes
The capture system supports three modes:
| Mode | Description | STA Traffic | AP Traffic |
|------|-------------|-------------|------------|
| **off** | Capture disabled | | |
| **acl** | ACL Monitor mode - only capture packets matching ACL rules with \`+M\` flag | (if flagged) | (if flagged) |
| **promisc** | Promiscuous mode - capture all AP client traffic | | All |
**Key behavior:**
- Packets are only buffered when a Wireshark client is connected (saves resources)
- In **ACL monitor mode** (\`pcap mode acl\`): Only packets matching rules with \`+M\` (monitor) flag are captured, from any interface
- In **promiscuous mode** (\`pcap mode promisc\`): All AP traffic is captured; STA traffic is only captured if it matches an ACL \`+M\` rule
The STA interface is intentionally excluded from promiscuous capture to avoid a feedback loop - the PCAP stream itself is sent over the STA interface to Wireshark.
**Use cases for monitor rules:**
\`\`\`
# Capture all DNS queries going to the Internet (for debugging)
acl add from_sta UDP any * any 53 allow_monitor
# Capture specific client's traffic without blocking (by IP)
acl add to_ap IP 192.168.4.100 * any * allow_monitor
# Capture specific client's traffic using device name
acl add to_ap IP MyPhone * any * allow_monitor
\`\`\`
### Quick Start
1. Set capture mode via the web interface (\`/config\` page) or serial console:
2. Connect Wireshark from your computer:
\`\`\`bash
nc
 ### Configuration
The OLED display is disabled by default. Enable and configure it via the serial console:
\`\`\`
oled enable # Enable OLED display (requires reboot)
oled disable # Disable OLED display (requires reboot)
oled gpio
### Configuration
The OLED display is disabled by default. Enable and configure it via the serial console:
\`\`\`
oled enable # Enable OLED display (requires reboot)
oled disable # Disable OLED display (requires reboot)
oled gpio - del
- clear - Clear all rules from list
acl
- clear_stats - Clear statistics for list
Lists: to_sta, from_sta, to_ap, from_ap
Protocols: IP, TCP, UDP, ICMP
Actions: allow, deny, allow_monitor, deny_monitor
bytes [[reset]]
Show or reset STA interface byte counts
[reset] reset byte counts or show current counts
pcap