Agent MCP Deployment Platform - AI Agent A2Z Middleware
AI Agent and MCP Server Hosting and Deployment Service. Agent and MCP Deployment Middleware and Hosting Infrastructure - DeepNLP x AI Agent A2Z
Website | GitHub | AI Agent Marketplace | AI Agent A2Z
Introduction
DeepNLP x AI Agent A2Z (aiagenta2z.com) provide public hosting service of AI Agent and MCP Deployment. Users can get a unique live subdomain endpoint for their agent/mcp project, which can be distributed and used in ChatGPT Apps Store, Cursor, etc to connect and use
, e.g. Live URL: ${owner_name}.aiagenta2z.com/${repo_name}/mcp
Features
Various Deployment methods: template, github_repo, and source code
GitHub/Source Code: Support both Python/Typescript, which is just like how you start your Agent locally, you can deploy in our cloud container and save money of without the heavy cost of renting a cloud server or get a domain name by yourself.
Templates: We provides 20+ templates in various business models, such as
selling productanddigital resourcese-commerce products agent/mcps as resources, vendors and content creators can expose their physical goods, digital resources (documents,files,online courses) etc to ChatGPT/Cursor.SubDomain URL: Each user can have a unique subdomain URL for your agents, able to verification and hosting services.
Domain Verification: We support subdomain verification for various platforms, such as OpenAI, WeCom, WeChat, DingTalk, etc.
API Monitor and Credit Rewards: You can visit the Deployed Agent API Dashboard to see the metric of your Deploy Agent & MCP and Billing Credits earned.
Examples Deployed
Deployment Type |
Framework / Package |
Example Folder |
Live URL |
Description |
|---|---|---|---|---|
GitHub Repo |
Quickstart (Typescript) |
https://quickstart.aiagenta2z.com/mcp_typescript/mcp |
Typescript MCP Quickstart Example |
|
GitHub Repo |
Quickstart (Python) |
https://quickstart.aiagenta2z.com/mcp_python/mcp |
Python MCP Quickstart Example |
|
GitHub Repo |
LangChain DeepAgents (Multi-Agents) |
https://langchain-ai.aiagenta2z.com/deep_research/chat |
LangChain Examples DeepResearch Agent of Tavily and Gemini model |
|
GitHub Repo |
LangChain DeepAgents (Agents + Skills) |
https://langchain-ai.aiagenta2z.com/content-builder-agent/chat |
LangChain Examples AI Content Builder + Image Generation Agent with Skills + Subagents |
|
GitHub Repo |
ChatGPT Apps SDK |
https://derekzz.aiagenta2z.com/solar-system_server_python/mcp |
ChatGPT App with MCP + Assets |
|
GitHub Repo |
AgentScope + Qwen3 + Tavily |
https://agentscope.aiagenta2z.com/deep_research_agent/chat |
AgentScope Deep Research Live Chat |
|
Source Code |
Python - Perplexity API DeepResearch |
GitHub https://github.com/jjjmc/perplexity_agent |
https://jjjmc.aiagenta2z.com/perplexity_agent/mcp |
Perplexity API Deep Search Agent |
Source Code |
Typescript - Fortune Telling Agent (ChatGPT App) |
https://derekzz.aiagenta2z.com/fortune-compass-agent/mcp |
Fortune Telling App MCP |
|
Template Product |
Deployment Templates |
- |
Deployment Template of OpenClaw/E-Commerce/etc |
Supported SDK and Packages
We provide python and typescript runtime suitable for various packages and framework, such as langchain , agentscope, etc.
Quickstart
1. Typescript - MCP Server
Overview
This typescript MCP server implements one tool greeting and one resource index (html in assets folder) in a mcp.streamable_http_app() and expose “/mcp” endpoint
Deployment Steps
Create new AI Service at AI Service Project
The quickstart tutorial is using (quickstart/mcp_typescript) which follows (username/project_name) format, you can change to (${your_user_name}/mcp_typescript)
Go to A2Z Deployment Panel
Choose Method Github
Public URL: https://github.com/aiagenta2z/agent-mcp-deployment-templates/tree/main/quickstart/mcp_typescript
Entry Point Starting Script:
pnpm --prefix ./quickstart/mcp_typescript install
pnpm --prefix ./quickstart/mcp_typescript build
pnpm --prefix ./quickstart/mcp_typescript start
Click
Deploy
Results
You can test the live /mcp URL on your client, such as Cursor, ChatGPT, Claude Code, etc.
{
    "mcpServers": {
        "quickstart-mcp-node": {
          "url": "https://quickstart.aiagenta2z.com/mcp_typescript/mcp"
        }
    }
}

Test resource in /assets folder
https://quickstart.aiagenta2z.com/mcp_typescript/assets/index.html
See examples README.md for more details.
2. Python - MCP Server
Overview
This server implement two tools add greeting in a mcp.streamable_http_app() at “/mcp” endpoint
Deployment Steps
Create new AI Service at AI Service Project
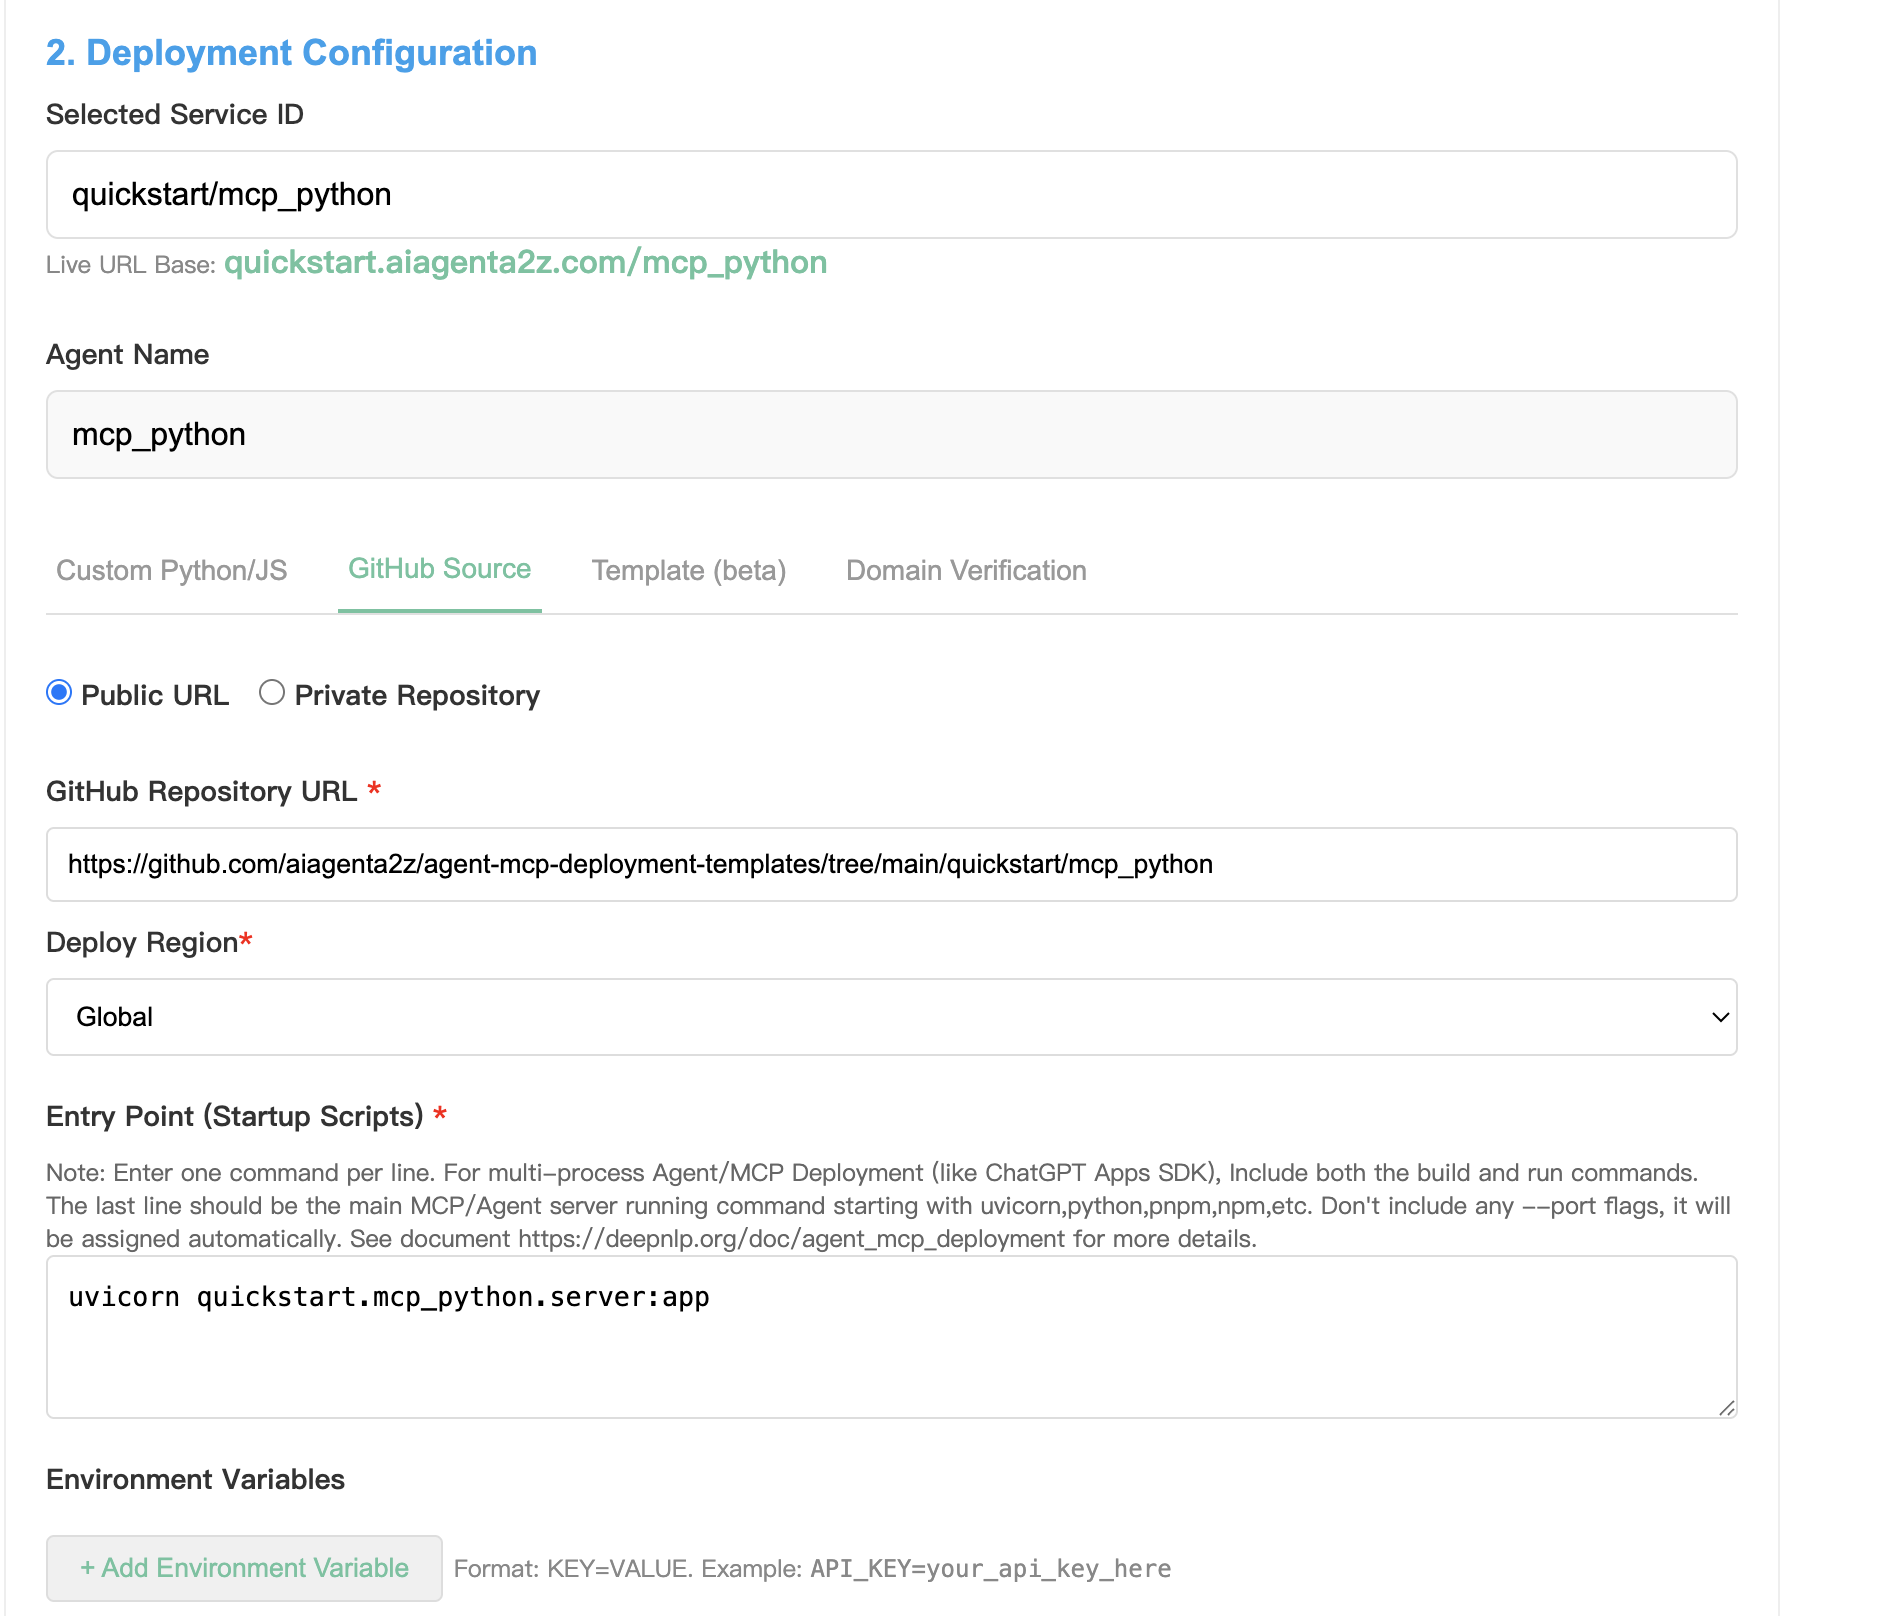
The quickstart tutorial is using (quickstart/mcp_python) which follows (username/project_name) format, you can change to (${your_user_name}/mcp_python)
2.Go to A2Z Deployment Panel
Choose Method Github
Public URL: https://github.com/aiagenta2z/agent-mcp-deployment-templates/tree/main/quickstart/mcp_python
Entry Point Starting Script:
uvicorn quickstart.mcp_python.server:app
3.Click Deploy
Results You can test the live /mcp URL on your client, such as Cursor, ChatGPT, Claude Code, etc.
{
    "mcpServers": {
        "quickstart-mcp-python": {
          "url": "https://quickstart.aiagenta2z.com/mcp_python/mcp"
        }
    }
}
See examples README.md for more details.
3. Typescript - Agent
4. Python - Agent
Tutorial
1 Deploy From Source Code
1.1 Python - Case Hosting a Perplexity Deep Research Agent
Lets’ say you want to implement a Perplexity Search API Customized Search API based MCP server and
want to expose a tool perplexity_research_agent(messages: List[Dict[str, str]]) perplexity_search_agent(question: str) for users to use.
The source code can be found in GitHub Perpleixty Agent
And you have already prepared below information:
Requirements
## Create a new project and Register AI Service
unique_id: jjjmc/perplexity_agent

## archived source code
git clone https://github.com/jjjmc/perplexity_agent
cd perplexity_agent

## archive the file
tar czvf perplexity_agent.tar.gz ./*
## zip on windows
perplexity_agent.zip

## Drag and Upload to Source

## Starting Command
uvicorn server:app

## pip requirement files in the archived source code perplexity_agent_code.zip
requirements.txt
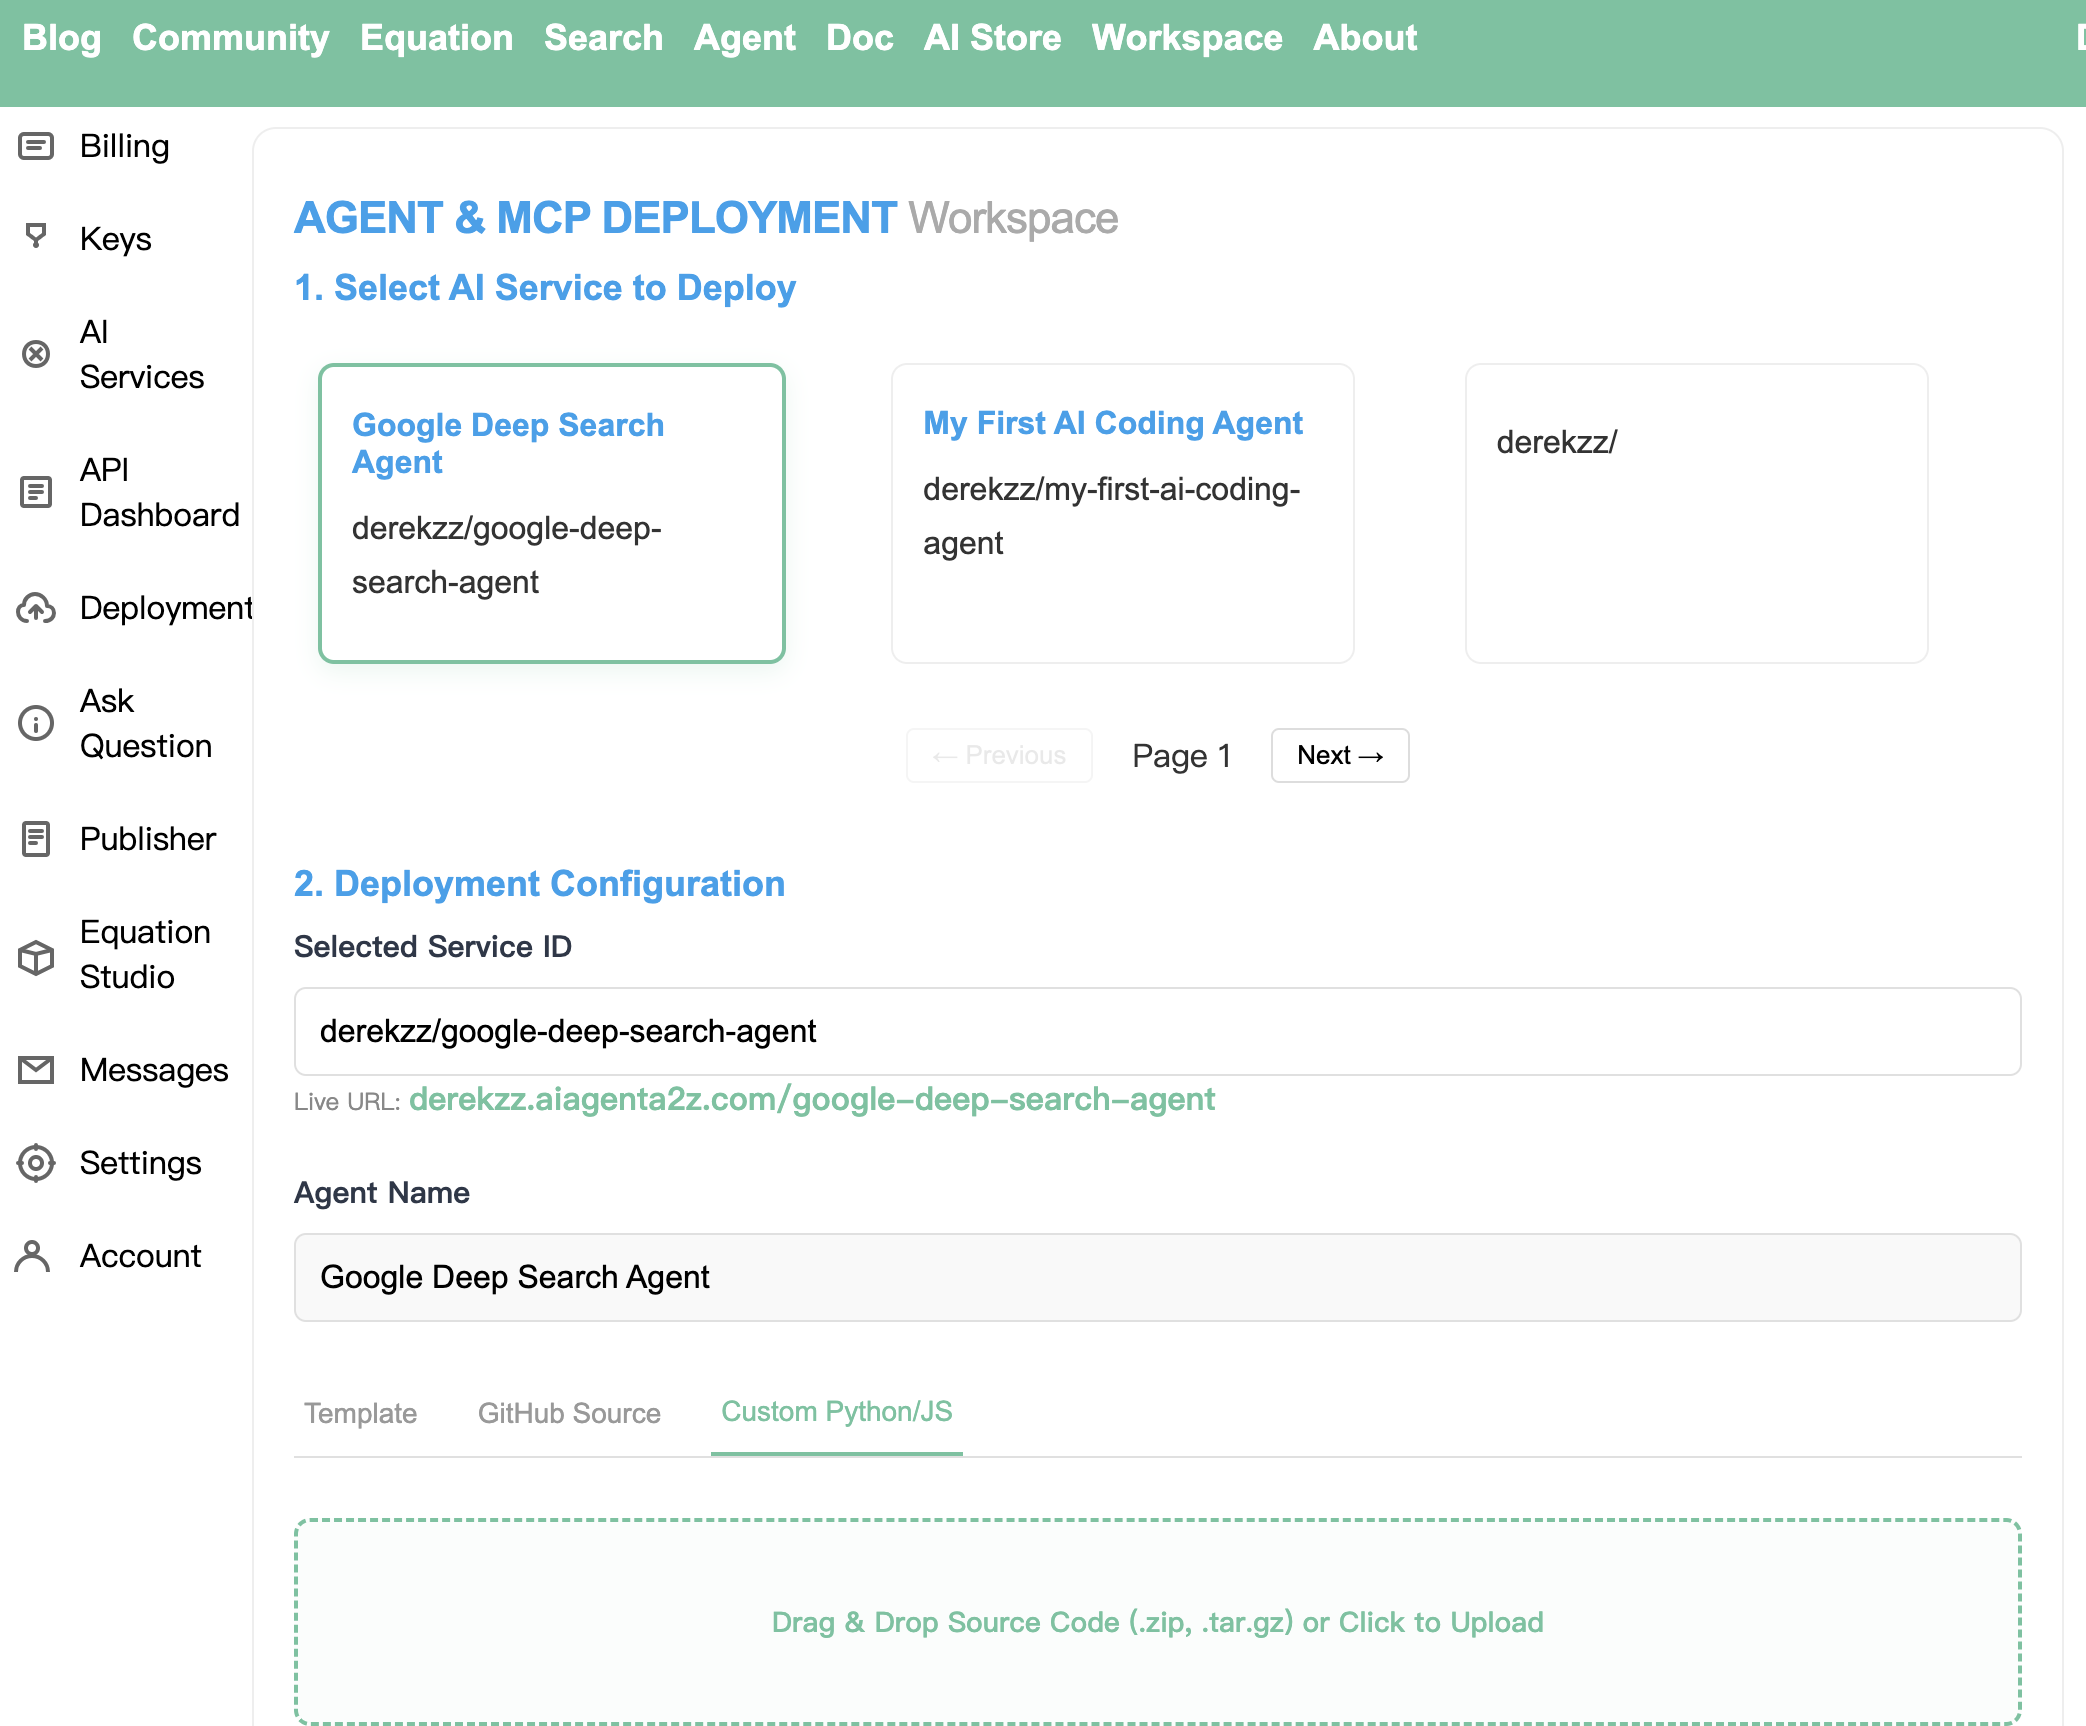
Step 1. Go to Workspace->Agent Deployment and visit the Deployment Workspace
Select the project to deploy ‘jjjmc/perplexity_agent’
Step 2. Switch Tab: Custom Python/JS
Drag and drop the source code archive file perplexity_agent_code.zip to upload
Step 3. Choose Config and Deploy
Deploy Region: global for avoid most ip restriction)
Entry Point: Input uvicorn server:app, this is the command that you use to start MCP/Agent server locally,
for example we have a server.py file and an app class, and we use uvicorn to start the mcp, please avoid specifying any ports
and we use assign dynamically.
Environment Variables: We put PERPLEXITY_API_KEY and DEEPNLP_ONEKEY_ROUTER_ACCESS as key-value pairs in this field. Note that your access key is safe and we will
use pass the keys as variables in the requests to start your service in the container. It’s equivalent to .env files in your uploaded sources.
PERPLEXITY_API_KEY=xxxxx
DEEPNLP_ONEKEY_ROUTER_ACCESS=xxxxx
Step 4. Deploy Click deploy button and please wait a while for the deployment to complete and you will find your subdomain live url ready!
MCP SERVER URL: https://jjjmc.aiagenta2z.com/perplexity_agent/mcp
1.2 Typescript - Case Hosting a Fortune Telling Divination Apps with UI
The source code can be downloaded from Github
Submit AI Service at AI Service project
Deployment from Source
Archive your source code to .zip or .tar.gz file
## archived source code
git clone https://github.com/aiagenta2z/agent-mcp-deployment-templates
cd chatgpt-apps/fortune-compass-agent

## archive the file
tar czvf fortune-compass-agent.tar.gz ./*
## or zip
fortune-compass-agent.zip
Step 1. Go to Workspace->Agent Deployment and visit the Deployment Workspace
Select the project to deploy ‘your_user_name/fortune-compass-agent’
Step 2. Switch Tab: Custom Python/JS
Drag and drop the source code archive file fortune-compass-agent.tar.gz to upload
Step 3. Choose Config and Deploy
Deploy Region: global for avoid most ip restriction)
Entry Point: this is the command that you use to start MCP/Agent server.
For typescript deployment, we usually use pnpm,npx, etc command to start the server. Since we are building from source code, the platform will first install dependency, build to ./dist/server.js and start from the js code there.
pnpm install
pnpm build
pnpm start
Environment Variables: If applicable
Step 4. Deploy Click deploy button and wait for completion.
SERVER URL: https://derekzz.aiagenta2z.com/fortune-compass-agent/mcp
{
   "mcpServers": {
       "fortune-compass-agent-live": {
         "url": "derekzz.aiagenta2z.com/fortune-compass-agent/mcp"
       }
   }
}
See README for more details
2. Deploy From GitHub Repo
Deployment from Github Repo is as easy as you git clone project from web start the mcp/agent server locally.
Imagine you are tenants on a shared hosting cloud service, and you just need to prepare a multi-line entry_point.sh shell script to let us know how you want to run the server.
mode |
url |
|---|---|
public |
example: https://github.com/openai/openai-apps-sdk-examples |
private |
Connect GitHub & Load Private Repos, Allow app ‘ai agent a2z’ to connect and clone your code |
2.1 ChatGPT App Example
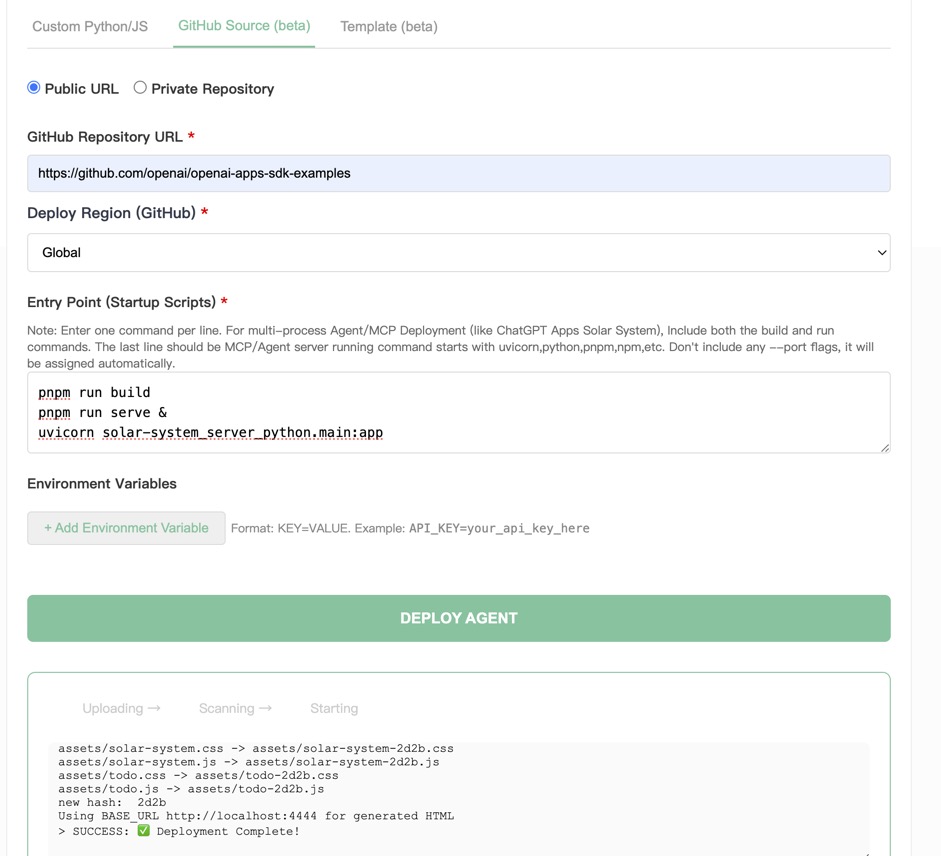
Step 1. Switch Tab to GitHub
Choose Public URL or Private Repository to allow us to connect to your private GitHub repos.
GitHub Repository URL: https://github.com/openai/openai-apps-sdk-examples
Deploy Region: Global or region for your plans applicable
Step 2. Prepare Your Entry Command
Entry Point (Startup Scripts):
This part is important and you might need to try various command.
Hints:
Enter one command per line. For multi-process Agent/MCP Deployment (like ChatGPT Apps Solar System), Include both the build and run commands.
The last line should be the main MCP/Agent server running command starting with
uvicorn,python,pnpm,npmetc. Don’t include any –port flags, the ports will be assigned automatically.Dependency Installation: Don’t add
node or pnpm install, cloud platform will handle it by reading your package.json, file.Static File Build and Serve: ChatGPT App will build static resources (Html/Css/Js) from the ‘src’ folder, and we have cached the prebuild example also. and you can also put the build command yourself.
Static File Serving: The example in the chatgpt app example started two web services: ‘pnpm run serve’ serve prebuild static file on port 4444, and
uvicorn solar-system_server_python.main:appis the main MCP server starting endpoint. Successfully deployed logs includeUsing BASE_URL http://localhost:4444 for generated HTMLandUvicorn running on http://0.0.0.0:8000. You have to make sure your command ‘pnpm run serve &’ add trailing ‘&’ to run in the backend and prevent blocking the scripts.Any Unknown Failures: Please remember to contact us via raising issues on GitHub and we will help you resolve the issues immediately.
pnpm run build
pnpm run serve &
uvicorn solar-system_server_python.main:app
or another app “kitchen-sink-mcp-node”
pnpm run build
pnpm run serve &
pnpm --filter kitchen-sink-mcp-node start
Environment Variables: If Applicable
Step 3. Deploy Click deploy button and please wait a while for the deployment process to complete and you will find your subdomain live url ready!
And wait for server to finish and once it’s done, you can copy and paste the server url in MCP client such as ‘cursor’,
MCP SERVER URL: `https://derekzz.aiagenta2z.com/solar-system_server_python/mcp
And you can see if it’s deployed successfully!
Copy and Paste into your Client
{
  "chatgpt-solar-system-mcp": {
    "url": "https://derekzz.aiagenta2z.com/solar-system_server_python/mcp"
  }
}
See ChatGPT App examples README.md for more details.
2.2 AgentScope Example-DeepResearch Agent
Example GitHub
We will implement and deploy a agentscope based deep-research agent, converting the original deep research example to
an FastAPI Server and expose the “/chat” API endpoint so that users can call the deep research agent by parameters messages and
get the deep research reports
Item |
Description |
|---|---|
unique id |
agentscope/deep_research_agent |
Live Chat URL(POST Only) |
https://agentscope.aiagenta2z.com/deep_research_agent/chat |
Playground |
https://agent.deepnlp.org/?agent=agentscope/deep_research_agent |
You can also use the Agent Router playground (WebUI) to start chatting with your live agents. Visit the URL https://agent.deepnlp.org/?agent=${unique_id}. Note that the returned streaming chunks should follow specific formats to work with the Agent Router Web UI. See Doc #assembly_message function for more details
See agentscope examples README.md for more details.
2.3 LangChain DeepAgents
We wrap two examples content-builder-agent and deep_research of LangChain DeepAgents multi agents examples and bring it live.
Example GitHub
This guide shows how to convert a LangChain DeepAgents content-builder-agent into a production-ready live service using BaseLiveRuntime from ai-agent-marketplace
The runtime wraps your agent and exposes a FastAPI streaming /chat endpoint automatically.
QuickStart
from ai_agent_marketplace.runtime.base import *

async def content_builder_stream_generator(
    agent: Any,
    user_query: str,
    **kwargs
) -> AsyncGenerator[str, None]:
    """
    """
    ## more

runtime = BaseLiveRuntime(
    agent=agent,
    stream_handler=content_builder_stream_generator
)

## Returned a FastAPI based app with /chat endpoint
app = runtime.app
And the detailed deployment steps can be found in LangChain Deployment examples, please follow README.md for more details.
3 Deploy From Template (Beta)
Use Case 1 Selling products
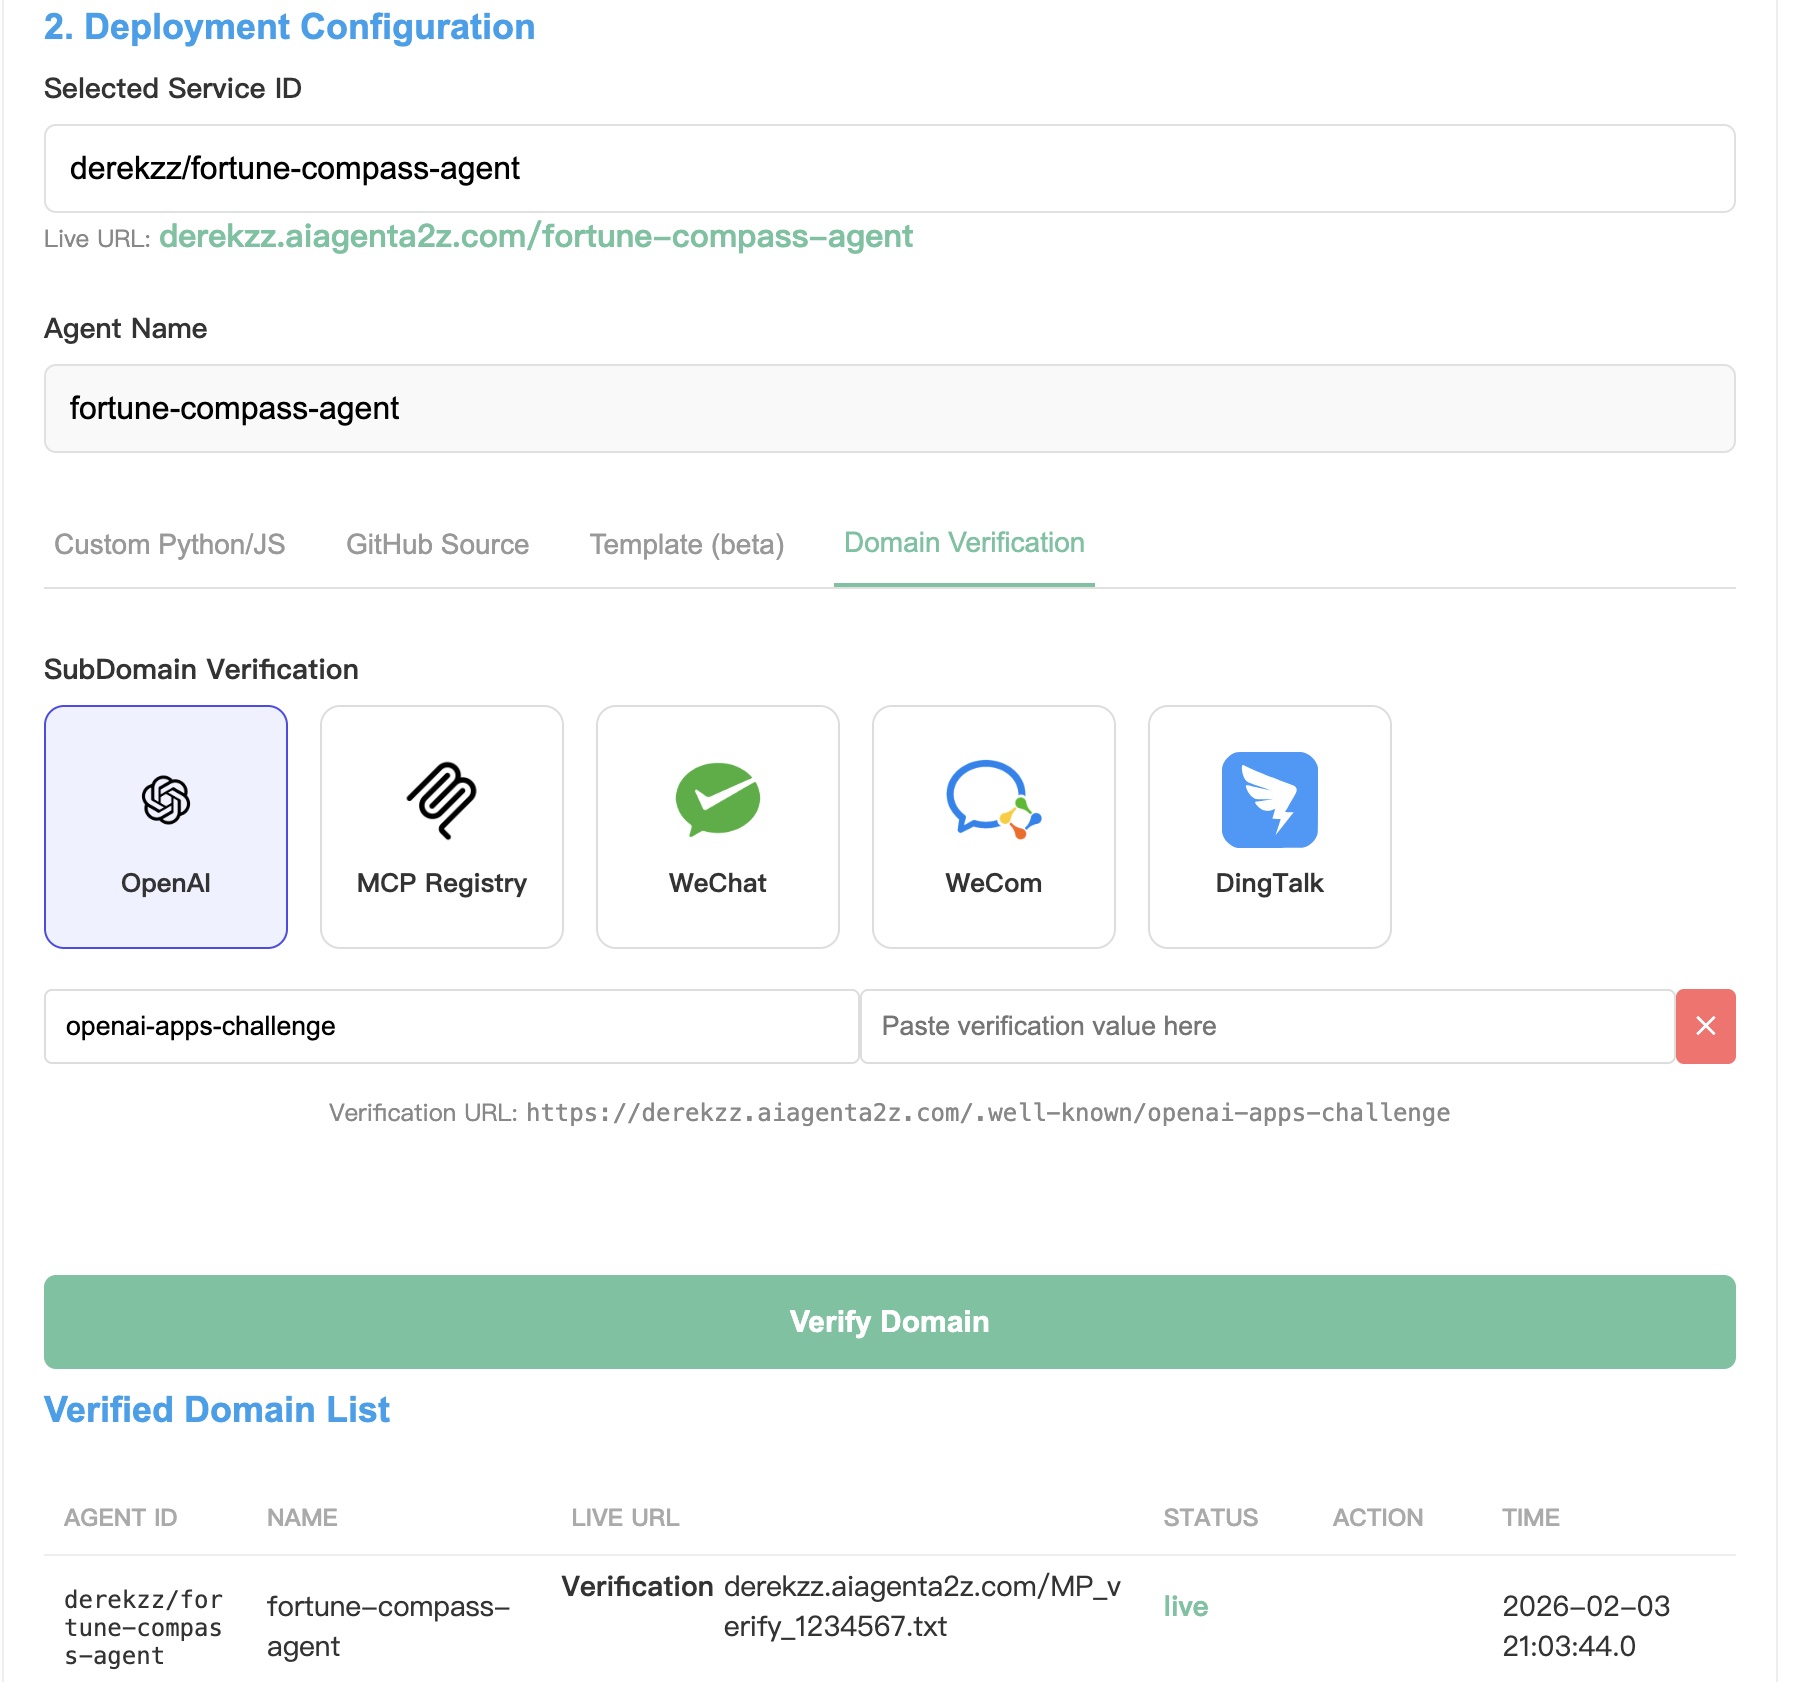
Domain Verification
The AI Agent A2Z Agent & MCP platform provides subdomain verification services to help you submit your deploy agents to various Apps Store and verify that you own the domains, such as ChatGPT App Store, MCP Official Registry, WeCom (Tencent), WeChat, DingTalk, etc.
Go to Deployment -> Deployment Configuration -> Domain Verification tab
You can choose your sites that need to verify for your customized subdomain: https://{username}.aiagenta2z.com Switch the tab, fill in the filename and content value, the just one click “Verify Domain”.
App |
Verification URL |
|---|---|
ChatGPT App Store |
https://{username}.aiagenta2z.com/.well-known/openai-apps-challenge |
MCP Official Registry |
https://{username}.aiagenta2z.com/.well-known/mcp-register-challenge |
WeCom (Tencent) |
https://{username}.aiagenta2z.com/WW_verify_xxxxxx.txt |
https://{username}.aiagenta2z.com/MP_verify_xxxxxx.txt |
|
DingTalk |
https://{username}.aiagenta2z.com/verify_xxxxxx.txt |
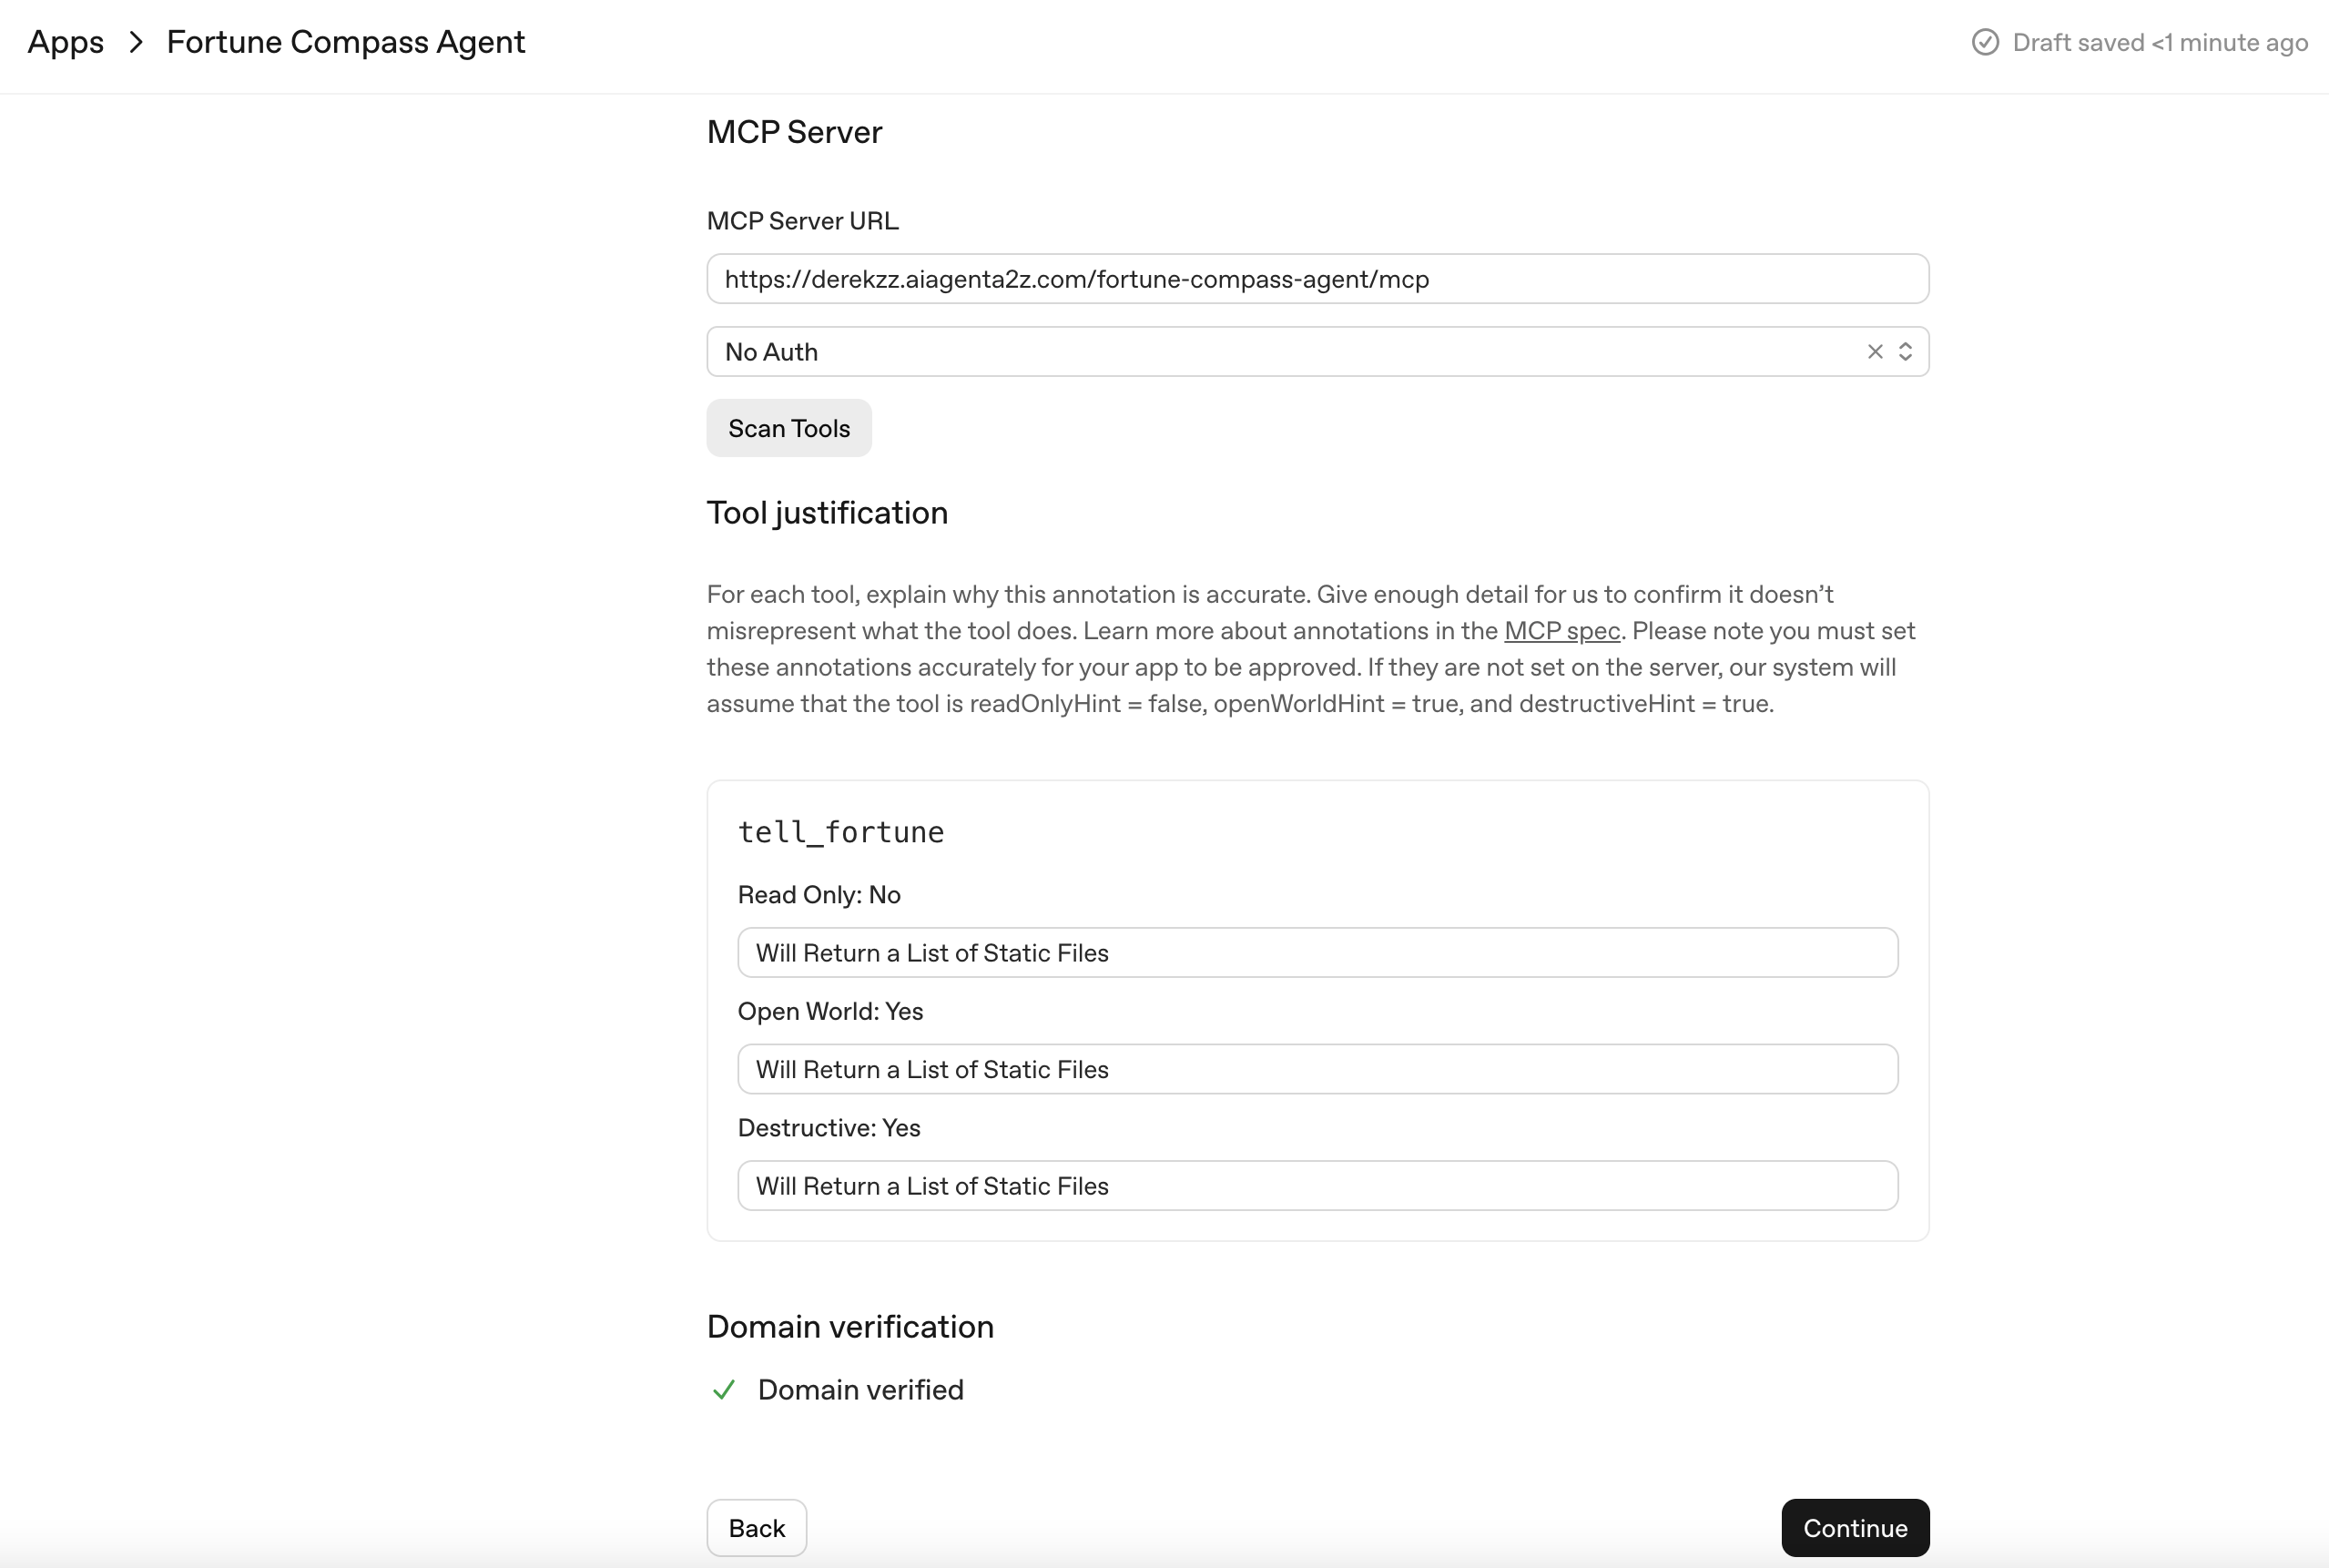
1. ChatGPT App Submission and Domain Verification
On the ChatGPT App Manage Page (https://platform.openai.com/apps-manage), you can submit your AI Agent by filling the form. You need to prepare a MCP Server URL (e.g. https://derekzz.aiagenta2z.com/fortune-compass-agent/mcp). Copy and paste the verification code under the file path
https://derekzz.aiagenta2z.com/.well-known/openai-apps-challenge
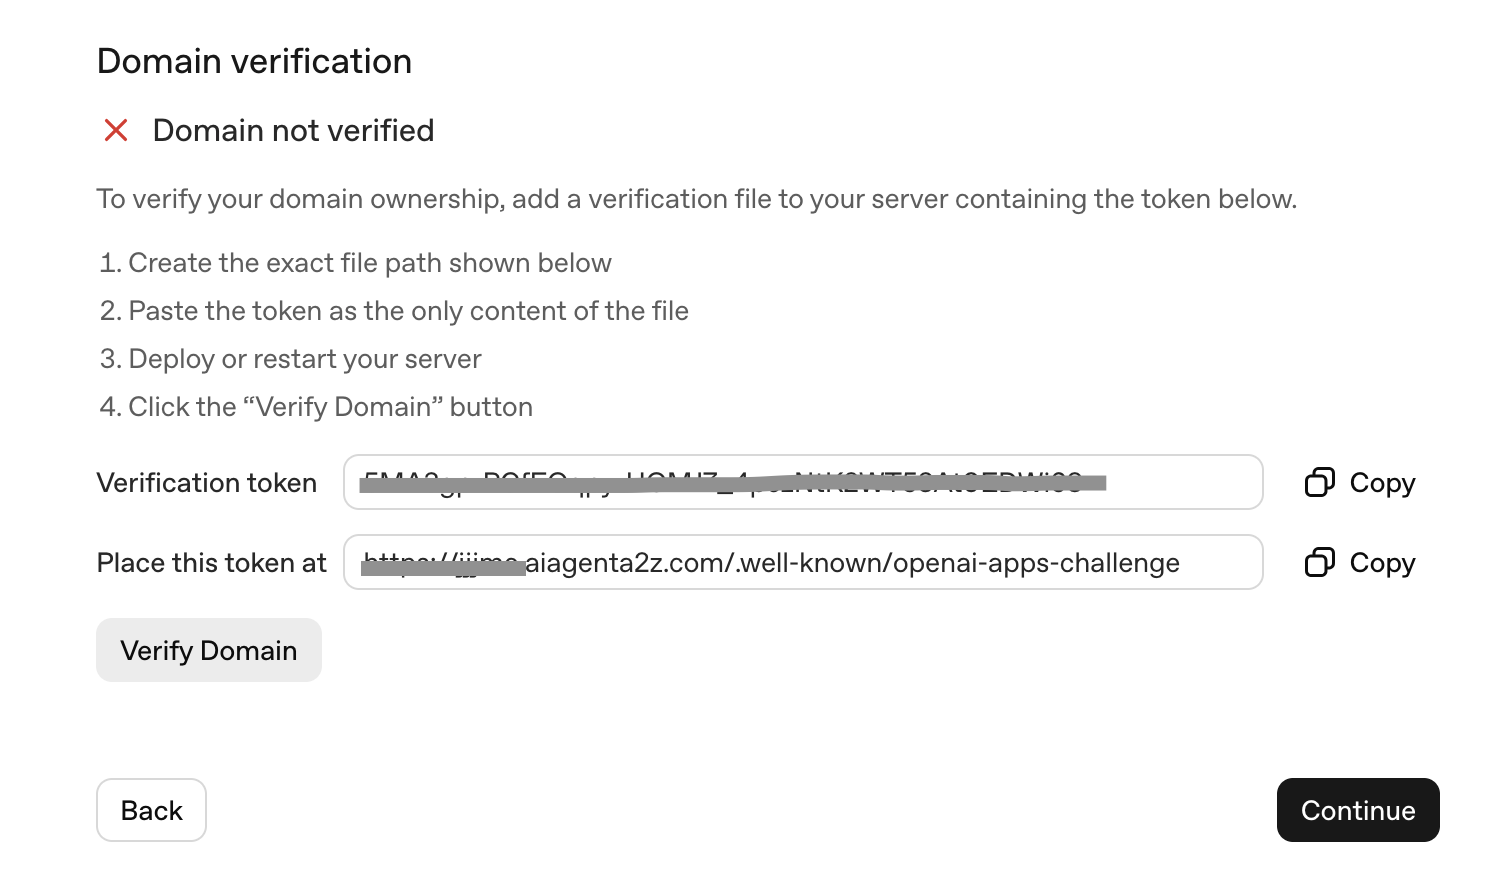
You can go to the Domain Verification tab of AI Agent A2Z Deployment (https://deepnlp.org/workspace/deploy) platform.
Fill the form of openai-apps-challenge with the code on the platform. Then click Verify Domain to add a record.
Please wait a while for the record to work. If you want to change the content, just add a new record and the content will be overridden.
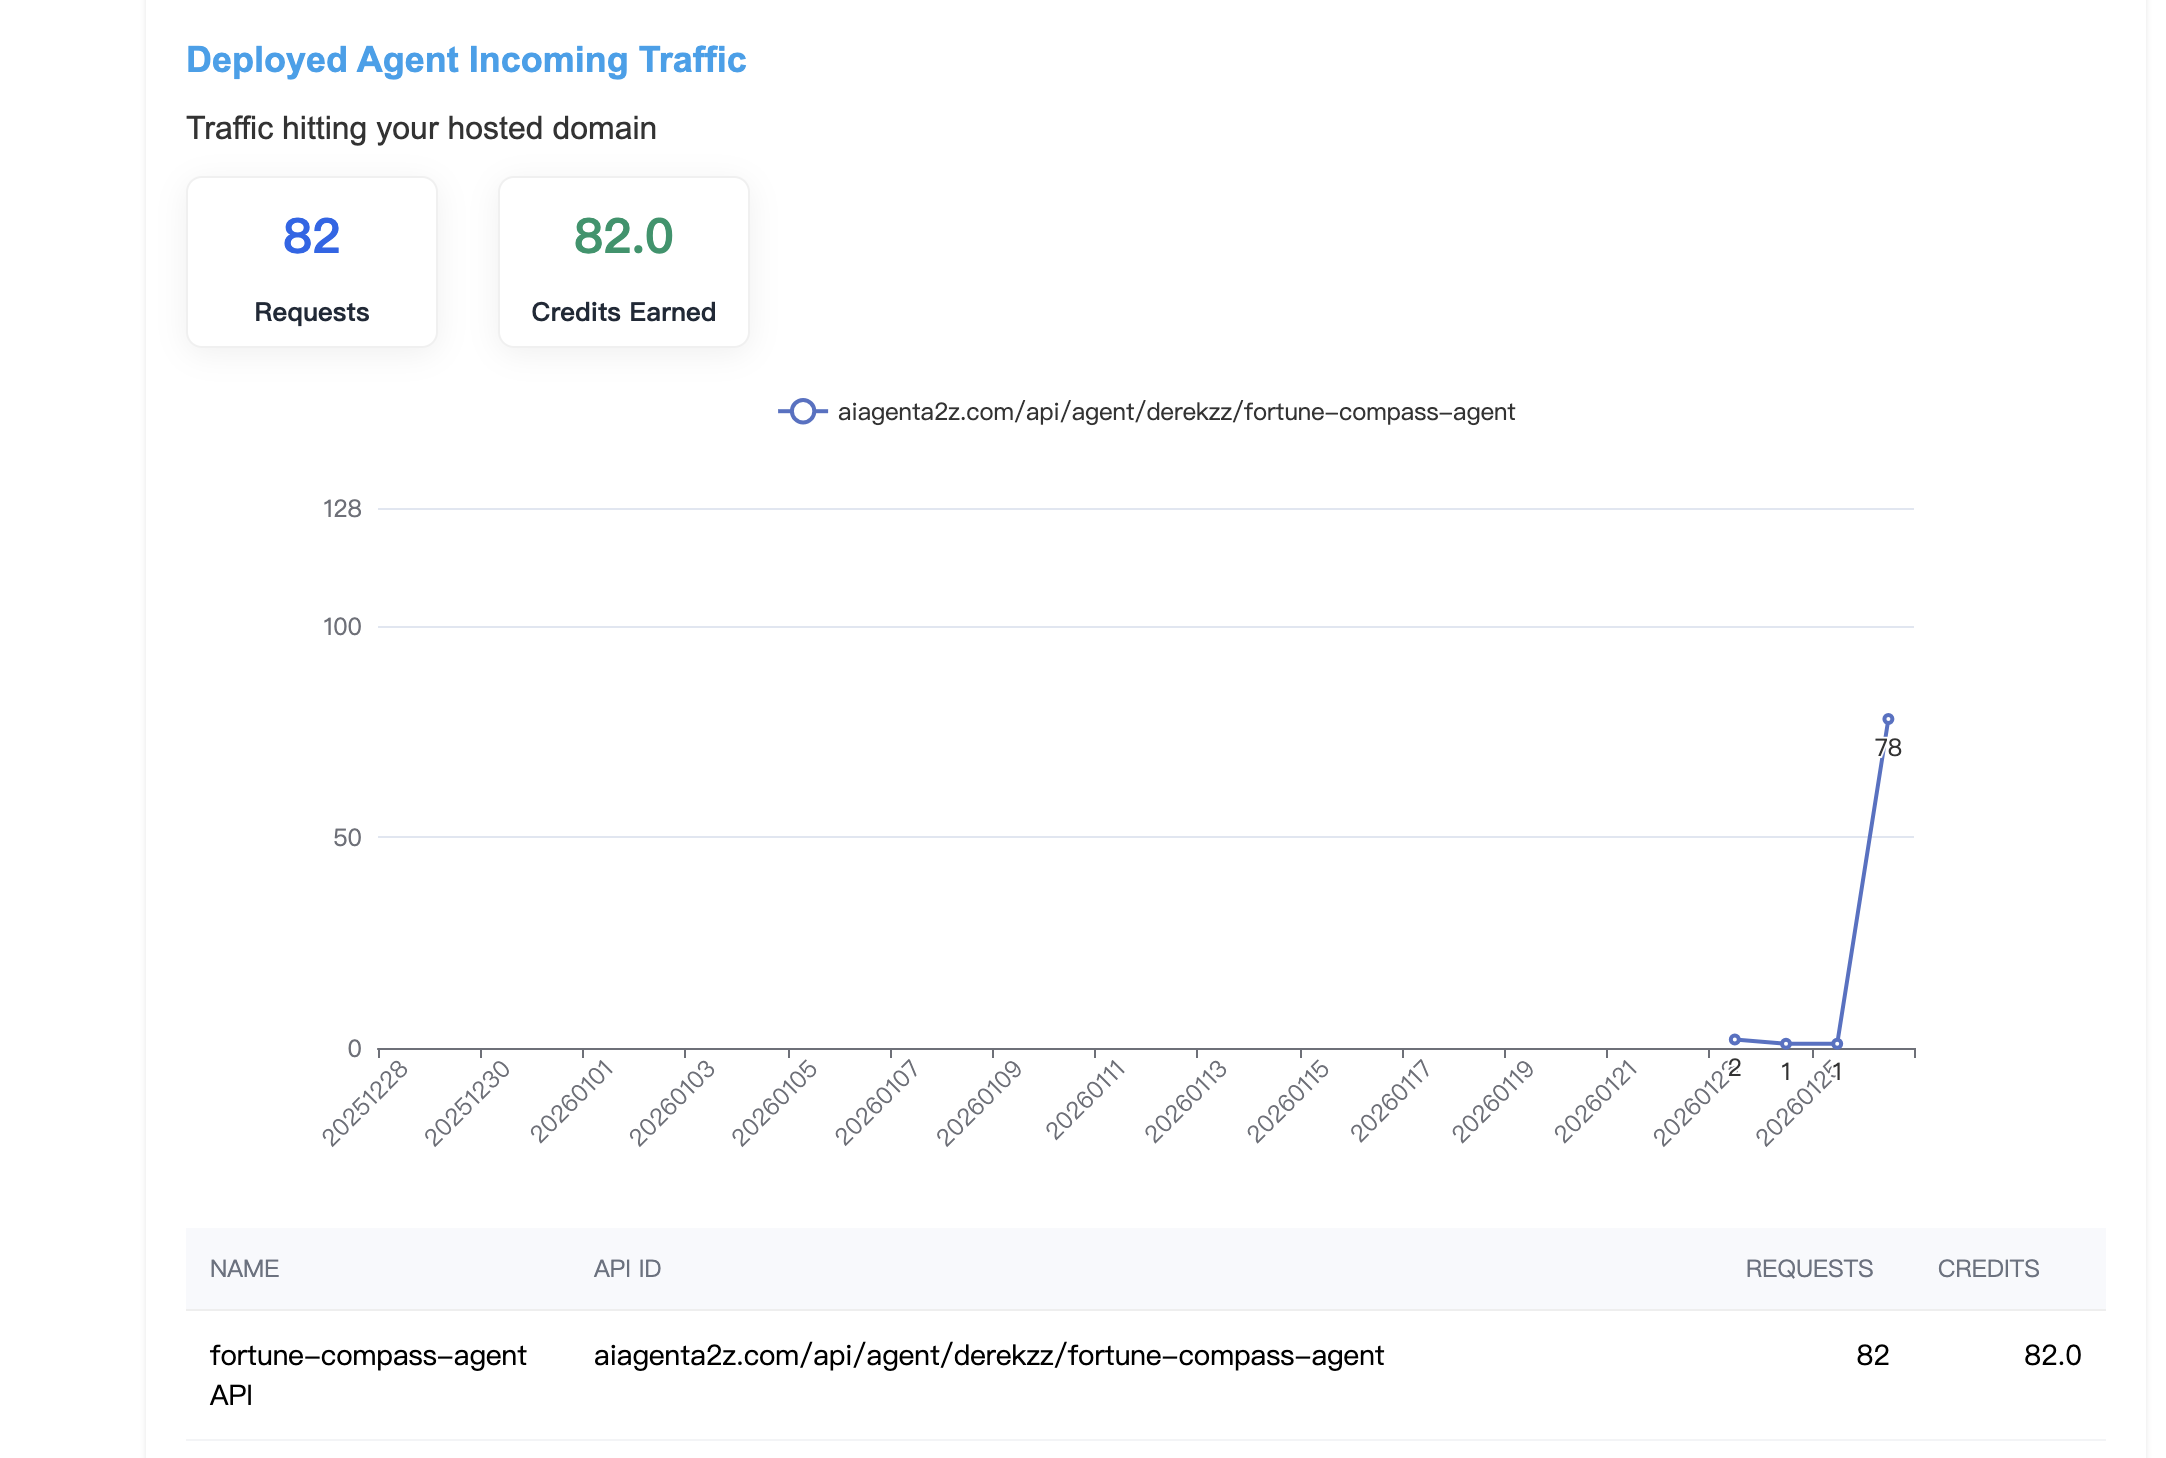
Agent API Dashboard
Agent API Dashboard helps you monitor statistics and credits account
After you have deployed your AI Agent (e.g. https://derekzz.aiagenta2z.com/fortune-compass-agent/mcp). The Deployed Agent API Dashboard will monitor the incoming traffic to the endpoint.
You can also visit the detail page to set API credit per call and you can start earn credits from your hard work. Visit the Billing Credits for detail reports.
Agent Router
Launch Your AI Agent with real user traffic by visiting Agent Router Website,

You can launch and expose your AI Agent to real users and attract user visit traffic via the Agent Router Web (https://agent.deepnlp.org) by registering either a /chat Agent endpoint or a /mcp MCP endpoint.
Please visit the Agent Router Docs for more details.
1. Agent Router with Chat Endpoint
For agent API with /chat endpoint and messages input, you can configure your AI Service “API Endpoint” with a POST interface that accepts the messages format and returns properly structured streaming chunks (including required fields such as type, format, content, and message_id)
so the Router can correctly render text, markdown, HTML, images, or other MIME types in real time;
Once configured, access your agent publicly at
https://agent.deepnlp.org/?agent=${unique_id}
${unique_id} follows {user_id}/{project_name} format
https://agent.deepnlp.org/?agent=agentscope/deep_research_agent
Enabling live routing, streaming UI rendering, and ecosystem exposure.
2. Agent Router with MCP Endpoint
To quickly get started with the /mcp endpoint, first click the Green Add button. In the panel, switch to the New Agent tab. Enter your MCP name and MCP server URL just as you would in other MCP clients, then click Connect and wait for a successful connection.
Once connected, click Add Agent to complete the setup. Your agent will then be available as a web-based MCP client, allowing you to explore and use its tools and capabilities.
For MCP API with /mcp endpoint, use the green button of “Add Cross” in the Router UI to connect your MCP server URL and automatically explore its tools like any MCP client;
Once configured, access your agent publicly at https://agent.deepnlp.org/?agent={unique_id}, enabling live routing, streaming UI rendering, and ecosystem exposure.
3. Agent MCP Usage Rankings
Agent and MCP APIs Usage Ranking https://deepnlp.org/agent/rankings